
I may have established the fact that I am rather OCD in certain areas. The older we get, the more crap we accumulate, the more we clean, the more your family comes in behind you and messes it up. I am learning that in order to get everything put back in its place without having to daily go full-on Mommie Dearest, I had to provide items with their very own place. And so my life as the female Bob Villa began.
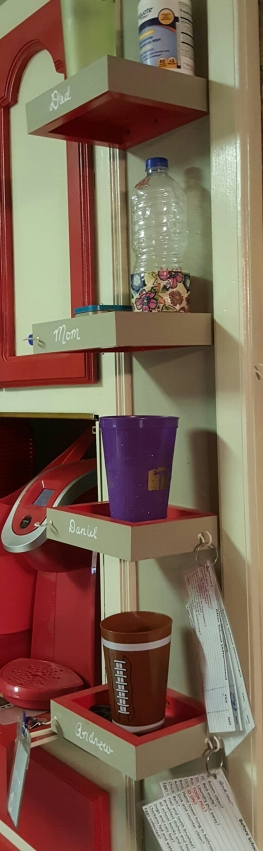
Today we’re going to talk about this:

Yes, the dreaded moment you realize everyone and their brother has at least three water glasses going at once…or didn’t take care of their dirty dishes (I can’t help you with the latter, because I’m still working on that here). I was starting to go a little insane, so I decided to make a place for these and other small items. There isn’t much wall space in my kitchen at all, so I went pretty small, but I knew I needed shelves. I can’t tell you how much this has helped! The dishwasher isn’t full of glasses everyday and I haven’t heard an, “Hey! That’s my cup!” argument in ages.
These took less than an hour to build and paint and are the most practical shelves I’ve put into the house. They are easy and I will walk you through all the steps you need. I am going to speak to the beginners among us, so skip over the detailed parts if you’re advanced. These will be 5.5 X 7.5 shelves, but you can adjust size slightly, if needed. *Please see note below for questions.
For this project you will need the following:
- Drill
- Level
- Stud finder (if you have one)
- Tape measure and speed square, if available
- 8 to 12, 1 1/2-2 inch screws
- .5-1 inch screws, or nail gun & air compressor with 1-1 1/2 inch nails
- Wall anchors (pictured below)
- PENCIL!!! (don’t put it down)
- 2 six foot 1×2’s for supports
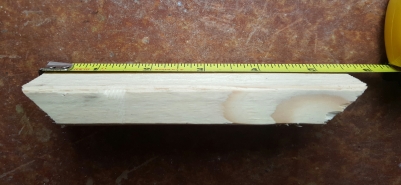
- Board for shelves at least 6 inches wide by 32 inches long
- Miter saw or nice people at Home Depot
- Wood glue

Simple tools for this job.


The flip drive pictured above is a great tool to have if you don’t want to switch tools or bits during the job, but a drill bit and a screw bit will work as well.
Step 1
Select the area on a wall where you would like the shelves. Take your stud finder and locate the studs in the wall. Use your level as a ruler and draw a level line where you would like your center shelf to go. Make sure that at least one screw along the line will go directly into a stud. You may have to pick a new spot if you can’t find a stud right where you want it. Just make sure the area can accommodate a 7.5 inch shelf.


NO STUD FINDER? If you don’t have a stud finder, simply take your level and draw a line with your pencil, using your level as a ruler.
Take a thin nail and a hammer and tap holes through the wall along your line until you meet resistance, indicating a stud. Mark the wall with your pencil (you put it down, didn’t you?), a few inches above the stud, lightly enough to be easily erased. Don’t worry about the small holes in the wall as your shelf should cover them.
*
Step 2
This is where you will need your miter saw, or a nice person at the hardware store to cut your wood.

Place your 1×2 on the saw and cut the 2 inch length at a 45 degree angle. Measure 5 1/2 inches from the tip of your 45 and cut the other side at a 45 in the opposite direction. Cut another 1×2 the same way, same length.
You can check your work holding the pieces back to back like this:

Cut two more pieces of 1×2 the same way, but make them 7 1/2 inches long from tip to tip as shown above. When you have all four pieces cut, you should be looking at a perfect picture frame.


Step 3
Run a small line of wood glue down the middle of the your 45’s and join the pieces together into that picture frame. If you have a nail gun, pin your frame together, using a speed square (if you have one) to make sure your angles are correct, 90 degrees.

If you don’t have a nail gun or pinner, you can take your drill and drill holes, using the smaller screws to put your frame together. Be sure to countersink your screws if you want to hide them with paint later, as shown in the photos below.


If you do not have a miter saw, or don’t want to make 45 degree cuts, you can join the ends of your wood like the image on the right.
Just be sure to adjust your measurements on your 1×2 frame to 2, 7.5 inch pieces and 2, 4 inch pieces.
Step 4
When your frame is put together and square, place it over the board you want to use for your shelf. Most people measure, but OCD woman likes to trace for an exact fit. If you want the frame to sit under the shelf (see left below), trace the outside of the frame onto your board. If you want to hide your shelf inside the frame (see center below), trace the inside of your frame, using the straight ends of the board to help, if possible. Like so:


Cut your board and make sure it fits within your frame, or squarely on top, depending on your method. I wanted to hide my board (I was using scrap wood) so I used wood glue on the board edges and pinned it inside the frame. You can also use thin screws and your drill.

Step 5
Your shelves are now built and you can paint them at this time, if you are using spray paint, otherwise, time to install.
Decide whether you want the frame on the top or bottom of the shelf. I did the Mom and Dad shelves with the frames down for more room and the kids’ shelves with the frames up to prevent spills.
Hold the 7.5 inch side of your shelf on the level line you drew earlier, making sure that the line on your wall and the line of the shelf match perfectly. Take your drill and drill holes for the 2 inch screws that will hold the shelves, being sure to drill through the wall side of your frame, into your stud and wall and countersink your holes.
I was lucky enough to have two studs close together, but I had to angle my screws (below)
 They aren’t pretty, but c’est la vie. Anyway, if you don’t have another stud, you’ll need to use anchors.
These are available everywhere and give added stability to a screw going into straight drywall. You’ll need to drill the hole larger (package will indicate hole size needed) and then you will screw in the same way you will to your stud. DO NOT use an anchor in a stud, as it is not necessary.


Now you can screw your shelf into the wall, being careful to keep it level, double checking with your level. Once your screws are in tight, but not too tight, spackle to hide them and any other area which needs it; let dry and paint. Voila!

***********************************************************************
*NOTE: Building these is vastly easier than describing how to do it, so if you have any questions, please ask them in the comments. Also, my computer seems to have lost its mind today, so if this looks like it was put together by my ten-year-old, I’m sorry.

This is excellent! Exactly what we need. Very clever and such a good way to remind the guys what they need to take to work or put things at night.
LikeLike
Thank you. They’ve been a life saver!
LikeLike