Saturday Crawfish Boil

It’s that time of year, people!  Time for me to impress my husband with my ability to inhale vast quantities of my favorite crustacean (I won his heart 17 years ago when I ate almost ten pounds on our first date).  Of course some of you may not be able to get your hands on this fantastic feast, BUT there are many places that will ship live crawfish if you are looking to give it a shot.

Join me as I walk you through a typical boiling day…well, we normally steam them.

Step 1

Decide the day before your husband is set to leave for a 2 week orientation class in Alabama that you need to have a crawfish boil.  Call your awesome crawfisherman cousin and get yourself a sack ordered.  Everybody split up and run for last minute items.

We went with:

40 lbs live crawfish

5 pounds potatoes

2 onions

3 lbs smoked sausage

liquid and powdered seafood boil seasoning 20160305_185228-1.jpg

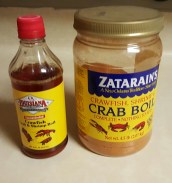
Extra powder boil, Tony’s and Cajun Chef hot sauce for finish

A 20 pound weight

Step 2

20160305_124809.jpg

Open your first beer and get those crawfish purged in salt water.  Change the water, adding more salt, until it stays clear.  Chances are you’ll need a second beer at this point.

While the crawfish are purging, make sure your big pot is clean and fill with about 2 inches of water, liquid and powdered seasoning.  Place the lid on the pot with the 20 pound weight on top of it and turn on your burner.

Freak out and run to the store since you just realized that you are out of propane.

20160305_143353-1.jpg

Okay, now you’re back from the store, the new tank is connected to your burner and we’re on to the next.

Step 3

Realize that since there has been a steady influx of neighborhood kids into the house and yard all day, you totally forgot to prep your vegetables, buy sausage and make dip.  It’s time to run back to the store and buy that sausage.

Step 4

Okay, now you’re back from the store…again.  Make the dip after cutting the sausage and peeling the onions. 20160306_100641-1.jpg

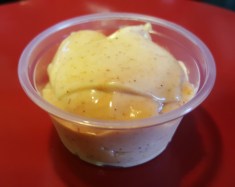
Dipping Sauce Indredients

1 1/2 cups mayonnaise or Miracle Whip

1/3 cup ketchup

1/4 cup Cajun Power Garlic Sauce (a mild Frank’s-type sauce can work)

2 TBSP Tony’s

Mix well and adjust to taste.

Step 5

Open a beer, make sure your lid and 20 lb weight are on the pot, turn on your burner and wait for the steam to start escaping in wisps.  Add your veggies and sausage in a metal colander for easy removal.  Replace the lid and the weight and wait for the steam to start escaping again.  Set a timer for 10 minutes.

Remove the colander and add the live crawfish to the removable basket and place into your pot.  Place the veggie colander on top, then replace the lid and weight, taking care to avoid major, agonizing steam burns.  Should you sustain a major burn, open another beer and wait for the pot to start steaming again.  Set your timer for five minutes.

Step 6

When the five minutes are up, remove the colander and crawfish to a large, clean ice chest.  Sprinkle liberally with Cajun Chef Hot Sauce, Tony’s and some of the powdered seafood boil.  Coat by stirring and shaking cooler.

Realize that you normally don’t drink beer and that you might be a wee bit tipsy.  Switch to water for a while.

Step 7

Take a moment to briefly panic about how you’re going to feed the 14 people you see before you when you had only planned for 7.  Now relax.20160305_153802-1.jpg

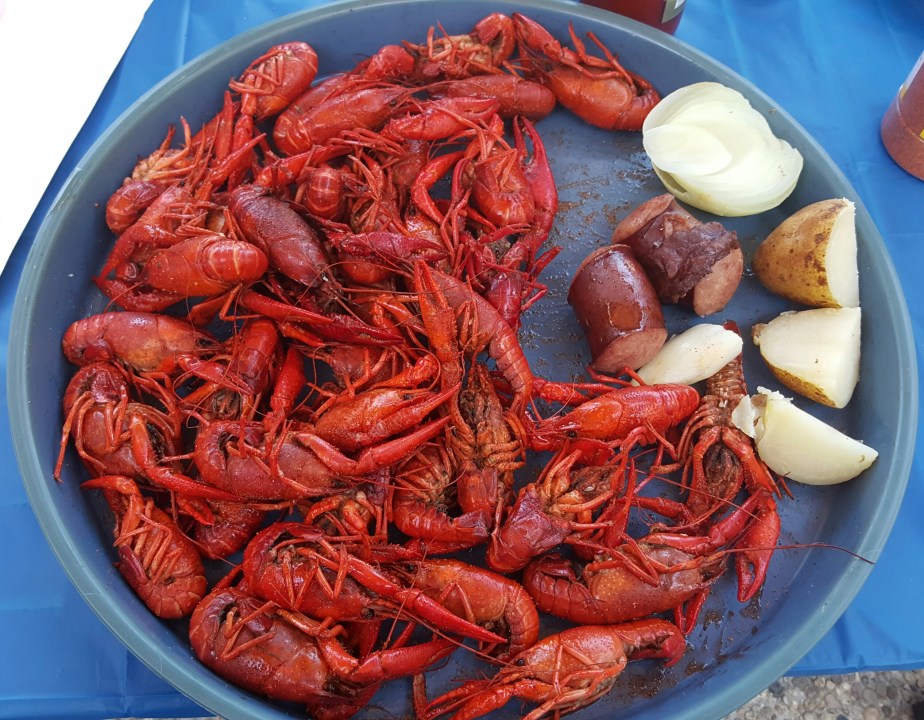
Scoop liberal amounts onto giant plates or dump it all onto a table covered with a plastic table cloth or newspaper for easy clean up.  Feed all the stray kids who’ve shown up and then grab some for yourself.

Open a beer, place a roll of paper towels close by, get yourself some dip and commence peeling and eating.  DO NOT be alarmed by the zen-like peace washing over you.  Enjoy it while it lasts as it will quickly dissipate when you realize those freaking kids are cleaning out the ice chest!

Step 8

Realize that you have defied all odds and are now full, with leftovers in the ice chest.  Either peel the tails and freeze them or admit that the beer and food have made you lazy and that your best course of action is to bag the leftovers, jump on the 4-wheeler and deliver happiness to your neighbors.

Step 9

Kick back, relax and fill those coolers with soapy water until tomorrow.  Watch the sunset and count your blessings.

20160305_181140.jpg

Optional Step

After sunset, facilitate an impromptu dance party in the garage with 4 and 7-year-old girls.  Take great pride sustaining little to no injury from the cartwheels you didn’t know you could still do.


Make it all Better with Fruit Leather

Good morning!  As our week’s weather looms large and lousy, I’ve decided it’s time for a fruit roll up/leather marathon.  I am blessed to have kids who want to learn to cook and I think their wives will thank me one day.  Fruit leather is something my boys love helping with this and all of us love to eat it.

It’s easy and a healthy alternative to store bought, over processed snack items.  I also like

FL9
The fruit leather bandit caught red handed!

the idea of knowing whose hands have touched my food…unless you’re working with Andrew and forgot to remind him to wash his hands.  This can actually be quite terrifying since he’s 10 and can get pretty darn dirty.  Luckily, his almost 13-year-old brother, Daniel is there to play second mommy if I forget.

Anyway, you can use almost any fruit, but remember that with grapes, you would want to run them through a food mill.  The following is a recipe I’ve played with, but there is no truly wrong way to do this.  Sometimes we even do just straight applesauce.

Fruit Leather Straps

Ingredients

3 cups chopped strawberries

1/4 cup water

1/3 cup sugar

1 TBSP lemon juice

2 cups unsweetened applesauce

Directions

Place the strawberries and water in a saucepan and bring to a boil.  Reduce heat, cover and simmer for 10 minutes, stirring occasionally.  Remove lid and test fruit to make sure it’s softened and taste to determine sweetness so you can adjust your sugar as needed.

Mash the strawberries with a potato masher, or get sick of that and grab your immersion blender like I did, then add the sugar and lemon juice, adjusting for more or less sweetness as needed with the sugar, and to enhance the fruit flavor with the lemon juice.  Simmer on medium to medium-high for about 5 more minutes.

Add the applesauce and check your sugar and lemon juice once more.  Simmer an additional five minutes.

Remove from heat and prepare your trays, allowing the fruit mixture to cool slightly to avoid scalding burns which can dampen the pleasure of any cooking experience.

Line the trays of a food dehydrator with heat tolerant (microwave safe) plastic wrap.  DO NOT USE WAX PAPER.  You will be chewing papery gum or just have to toss it since the fruit mix will fuse to the wax paper.  Yes, I’ve done this at least three times.

Place a thin layer (1/8 to 1/4 inch) of the fruit mix onto the trays and run them in the dehydrator for a few hours, being careful not to burn.  The leather is finished when it is not soft to the touch or sticky and will peel right off the plastic wrap.

IF YOU DO NOT HAVE A DEHYDRATOR you can do your fruit in the oven.  Line cookie sheets with heat safe plastic wrap and pour a thin (1/8 to 1/4 inch) layer of the fruit mixture into it, being sure that the plastic wrap doesn’t fold over onto the fruit so it can’t dry.

Place in a 140 degree oven, or a convection oven and let dry 8 – 12 hours, until the surface is no longer wet or sticky.

You can roll the leather up in the plastic wrap for storage…if it lasts long enough.


Savory Stuffed Pork Tenderloin

Today we’ve got another easy recipe made difficult (for me) because of my inability to actually measure and write things down.  I think I’ve got it together, but you will likely want to put your own spin on this one.  Thankfully, I usually end up developing or tweaking recipes that don’t require precision, so they are pretty hard to screw up.

With a family of growing boys who are most certainly meat eaters, this has been a crowd pleaser and, while it takes a while to cook, it’s simple to put together.  I usually use a 1.5-2 pound tenderloin, but was fooled by packaging and ended up with 2 little 1-pounders, so that’s what I’m working with today.  As usual, see the notes for other ways to play with this one.

Savory Stuffed Pork Tenderloin

Ingredients

2, 1 lb pork tenderloins

3 TBSP butter

1 box dry sage or herb stuffing mix

1/2 tsp poultry seasoning, divided

2 tsp garlic salt, divided

1/4 cup chicken broth

1 TBSP olive oil

salt and pepper to taste

Directions

Preheat oven to 350 degrees

Slice your tenderloin(s) lengthwise, but do not cut all the way through.  Spread the halves open and cover with plastic wrap.  Use a meat mallet to flatten until you have an even thickness of about 1/2 inch and all the days frustrations have dissipated.  Brush the tenderloin(s) with about half of the olive oil and sprinkle with half of the garlic salt and poultry seasoning, rubbing into the meat.  20160303_162231-1.jpg

Melt the butter, then add the stuffing mix, broth and salt and pepper to taste.   Spread the stuffing mix over the flattened tenderloins(s) to within about 1/2 inch of the edges.

Starting at the shortest end, roll the tenderloin(s), tucking in 20160303_164631-1the sides and secure in 3 places with white kitchen string (I remember the string about 20% of the time, so it’s okay if you don’t have any.  Just handle with care).

Transfer to a baking dish large enough to prevent the meat from touching, if you are making 2, or an appropriately sized dish for 1.  Brush the outside of the rolled tenderloin(s) with the remaining olive oil and rub with the remaining garlic salt and poultry seasoning.

Bake, uncovered for 45 minutes.  Cover loosely with foil and return to oven for 15-20 minutes, or until a meat thermometer reads 160 degrees F.

Remove from oven and allow to stand (tented with the foil) for about 15 minutes before slicing for the best flavor and to avoid searing off all of your taste buds.

Notes

As you’ve likely figured out by now, my super power seems to be flying by the seat of my pants.  This recipe is easy to play with.  Try Tony’s, a little extra salt, sage, poultry seasoning and garlic.  You can also add raisins and substitute apple juice for the chicken broth if you prefer a sweet pork.  Like I said, it’s almost impossible to screw this one up.


Shiny! Balsamic Glazed Steak Salad

Chuck helps
Oh, please drop something, Mom.  Please.

Yesterday was a good day for a salad.  Having previously discovered homemade potato chips, and then eating them all, I was due for some raw greens.  Luckily, my gang loves a good salad, so here’s an easy one for you.  The glaze turns already delicious steak into something magical.  Use any salad ingredients you like and have fun.

I also recommend having a good kitchen helper.  Mine just tidies up the floor for me, but every little bit helps.

Oh, and 5 points if you got the Firefly reference in the title of today’s post.

Balsamic Glazed Steak Salad

Ingredients
serves 4

2-3 steaks, any cut you like, but thicker is better

4-5 cups chopped greens: iceberg or romaine lettuce, baby spinach, etc.

3 tomatoes, wedged

2 avocados, wedged

1 cucumber, sliced

1 celery stalk, diced

1 carrot, shredded

broccoli, chick peas, shredded parmesan cheese, etc.

for the glaze

1/2 cup cold water

1 TBSP cornstarch

1/2 cup brown sugar

1/4 cup balsamic vinegar

2 TBSP soy sauce

Directions

A few hours before your meal, lightly salt and pepper the steaks, drizzling with 1 TBSP Worcestershire sauce, if desired.  Return to refrigerator, then remove to counter to rest 30 minutes before cooking.

Place the steaks on a grill on high heat about 3-4 minutes per side, depending on thickness of cut.  Remove from grill and keep warm.

Add the cold water and cornstarch to a small saucepan, combining until the cornstarch dissolves.  Add the remaining glaze ingredients and bring to a boil, stirring constantly.  Reduce heat and simmer until thick, about 3 minutes.  Remove from heat.

Cut the steaks into strips and return to grill.  Brush with the glaze until a nice crust begins to form, turning frequently, taking care not to overcook.  About 4 minutes.  Remove from grill, tent with foil and rest for 5 minutes.

Place all salad ingredients in bowls and top with dressing of choice.  We recommend Balsamic Vinegar or Toasted Asian Sesame Dressing.  Enjoy.


The GREATEST Salsa on Earth

If you’ve seen this post before, then you know that I am still learning the ropes here and I thank you for your patience.  I just couldn’t afford to let this one get lost in the shuffle.  Annie, whoever you are, you are a salsa magician.  You will never be able to keep enough of this on hand.  Fair warning.

Salsa after

ANNIE’S SALSA

8 cups tomatoes, peeled, chopped and drained (see “Easy Tomato Peeling”)

2-1/2 cups onion, chopped

1-1/2 cups green pepper, chopped

3 – 5 jalapenos, chopped

6 cloves garlic

2 teaspoons cumin

2 teaspoons ground black pepper

1/8 cup canning salt

1/4 cup fresh cilantro, chopped

1/3 cup sugar

1 cup 5% apple cider vinegar (I like to use 1/2 cup apple cider vinegar and 1/2 cup lime juice for taste.  Personal preference rules, as long as it adds up to one cup)

2 cups (16 oz.) tomato sauce

2 cups (16 oz.) tomato paste

Mix all ingredients, bring to a boil and boil for 10 minutes. Pour into hot pint jars leaving 1/2″ headspace, seal and process in a boiling water canning bath for 15 minutes.

Makes about 6-7 pints.

Additional altitude and other fantastic information can be found at:

http://faq.gardenweb.com/discussions/2766092/annies-salsa-recipe

Salsa before It’s even pretty before you cook it!

40 Minute Burger Buns

So, it’s Sunday, I have two sick kids, a husband in Alabama and some serious storm clean up to do.  Forgive me for starting the day with a repeat post, but I had a few requests for this one again.  I don’t know why people couldn’t dig it out of the archives (a mystery I am looking into), but here it is again.  I’ll be back later, I promise.

It was sloppy joe night at our house and I realized that I didn’t have any hamburger buns.  Calling on the power of Google, I found the following recipe and they were delicious!  You can easily change the size and number of buns you make and I chose to do 8 larger buns for my crew.  They were almost too big, but still awesome.  I didn’t have sesame seeds, so I did the egg wash and used roasted garlic salt.  Thanks, Girl vs. Dough!  Hamburger Buns

These are the 8  that I made.  Don’t judge my ability to eyeball equal portions. 

40-Minute Super Soft Hamburger Buns
AUTHOR: ADAPTED FROM TASTE OF HOME
PREP TIME:  30 MINS
COOK TIME:  10 MINS
TOTAL TIME:  40 MINS
YIELDS: 12 BUNS
INGREDIENTS
  • 2 tablespoons active dry yeast
  • 1 cup plus 2 tablespoons warm water (110 to 115 degrees F)
  • ¼ cup granulated sugar
  • ⅓ cup vegetable oil
  • 1 egg, lightly beaten
  • 3½ cups all-purpose flour, plus more for kneading and shaping
  • 1 teaspoon salt
  • 1 egg yolk mixed with 2 tablespoons milk (for egg wash)
  • 2 tablespoons sesame seeds
DIRECTIONS
  1. Heat oven to 425 degrees F. Spray 2 baking sheets with cooking spray.
  2. In a large bowl, whisk yeast into warm water until dissolved. Add sugar and oil; let stand 5 minutes. Add egg, flour and salt. Use a wooden spoon to stir until just combined.
  3. Turn dough out onto a lightly floured surface. Knead by hand 3 to 5 minutes, adding more flour to dough as needed until a smooth, soft, elastic and only slightly sticky dough forms.
  4. Divide dough into 12 equal pieces*; shape each piece into a smooth ball. Place buns at least 3 inches apart on prepared baking sheets (6 buns per sheet). Cover buns with tea towels or lightly greased plastic wrap; let rest 10 minutes.
  5. Uncover buns and brush tops with egg wash; sprinkle with sesame seeds. Bake 10 to 15 minutes, rotating pans halfway through baking, until buns are golden brown. Transfer to a cooling rack to cool completely.
  6. *NOTE: This recipe makes 12 small slider-size buns. For larger buns, simply divide dough into fewer pieces and increase the baking time.

http://www.girlversusdough.com/2015/08/10/40-minute-super-soft-hamburger-buns/

Potato Chips; We’re Gonna’ Need a Bigger Bowl.

Believe it or not, we really don’t eat a lot of fried food around here.  Usually, if the guys request french fries, for example, I will bake them and they are none the wiser.  Other than my fried chicken, which I finish in the oven, spring rolls and Jamie’s amazing fried fish, we try to keep things pretty healthy…well, at least not fried.

With this in mind, yesterday I decided to try a baked potato chip recipe I found online.  I admit that I am not a potato chip fan.  I never buy them and I could go the rest of my days without, but I tried this for the guys since they are indeed fans.  It was a miserable failure.  The chips came out either burned or floppy, nothing in between, but at least the chickens loved them.

Disgusted and annoyed at the waste, I spotted the unused, extra peanut oil left over from our Christmas turkey.  Oh, I guess we fry that too and I feel zero guilt about that because fried turkey has ruined me for any other.  Anyway, I pulled out the mandolin and sliced the rest of my potatoes, deciding to go for it.  I couldn’t end the day with those failed, nasty oven chips.  I needed a win.

The results were fantastic.  I am terrified by how much I loved these things.  I filled a 4 quart container with them so Jamie could take them to work, but he and I ate almost the entire thing.  We had to force ourselves to leave a thin layer of chips at the bottom just so the kids could try them.

They take a little time, but BEWARE, they are worth it.  Deep fried crack, my friends.  Deep fried crack.

Potato Chips

Ingredients

4-6 large russet, or other potatoes, peeled and sliced thin

peanut oil for frying

salt, pepper and/or other seasonings to flavor chips (flavored popcorn salt, cheese powder, onion powder, chili, etc.)

Directions

Fill an electric skillet, or large stove top skillet, with about an inch deep layer of the peanut oil and heat to just between 350 and 375 degrees, taking care to not exceed 375 degrees.

Slide the sliced potatoes in one at a time, using metal tongs or a slotted tool to prevent them from fusing together.

Fry until golden brown, flipping with tongs halfway through cook time,  about 4 minutes per side, 8 minutes total (you will quickly discover the perfect timing since, if you are like me, you will have to taste every other chip.  I tell my kids I do this because I love them and have to test for poison, but I think they’re onto me).

Remove to paper towel to drain and sprinkle with salt and/or other seasonings.

I used Himalayan pink salt and a powdered cheese pack lost to its macaroni box long ago.  After draining, I moved the chips to a lidded container and shook to coat completely.

Voila!  Yummy.  Store in an airtight container lined with a clean paper towel, but know that this is futile because these chips will not be around long enough to require storage.

Chips.jpg
I feel guilty just looking at this picture!  So good. 


Chicken with Asparagus and Roasted Pine Nuts

Mothers all over the world are faced with the daily battle of how to get their children to eat certain foods without having to pull out the biggest weapon in our arsenal, “Because I said so!”  Now, I don’t want to spark a debate about whether or not we should make our kids eat things they don’t want to eat, but I will say that I make my kids try everything at least once.  Not only do I want to expose them to as much culinary variety as I can, I want them to be able to go anywhere and understand menus or to be able to go to a friend’s house and not have to demand a separate dinner for themselves.  I have made it abundantly clear that I do not run a diner and you eat what’s in front of you, whether here, or at another house.  Your likes and dislikes will be noted and taken into consideration in the future (maybe.  Meh, probably).

That being said, asparagus was a tough one for me.  Until my friend Sean introduced me to its wonders at a fondue party back in the 90’s (yeah, we still do those), I had no idea what I was missing.  Also, if we’re honest, there is always that moment of panic when you head to the restroom after eating asparagus, when you think you may be dying, only to realize it’s asparagus magic.  I assumed my kids would feel the same trepidation, but the following recipe laid those fears to rest.  On the night I make this meal, the pre-dinner conversation usually goes something like this:

“Mom, what’s for dinner?”

“The chicken with pine nuts, asparagus and penne pasta.”

“Woo-hoo!  Awesome!  Thank you, Mommy!” I’m only Mommy when something really cool goes down these days and last night I even got two hugs for this announcement.

Actually, the best testimony for this meal involves cooking it for our former pastor.  We had invited he and his wife for dinner and they drilled me on what was on the menu.  Apparently, they are picky eaters who don’t let others cook for them and usually bring their own food everywhere they go (just one of their many oddities, and no, it wasn’t dietary issues).  If you know me, you know I wasn’t going to have that, so I convinced them to trust me.  They ended up eating two bowls each and asking to leave with the leftovers.

I hope you and yours feel the same way.  Just note that I am making this meal for three bottomless pits, so if you just want to give it a try, cut the whole recipe in half.  Also, for an easier one-pot method, see the notes below.

Chicken with Asparagus and Roasted Pine Nuts over Penne Pasta

Ingredients

16 oz cooked penne pasta (uncooked, if you choose the 1 pot method below)

32 oz canned chicken broth

1 cup pine nuts

4-6 boneless, skinless chicken breasts, cubed

4 TBSP olive oil

4 cloves garlic, minced

1 1/2 lb asparagus, cut into 1 inch pieces

1 1/2 – 2 cups grated parmesan cheese

Directions

Toast the pine nuts in a dry skillet until golden brown (try to avoid the urge to walk away and do something else, lest you end up with the chocolate chestnut color I normally do) and then remove from heat.  Set aside.

Stir fry your chicken in 2 TBSP of the olive oil on medium high until no longer pink.  Remove from heat. *

In a large pot heat 2 TBSP oil on high and saute garlic 2-3 minutes.  Add broth and heat to a gentile boil.  Add asparagus, reduce heat and simmer until tender, about 10 minutes.  Toss chicken, cheese, pine nuts and pasta together in the asparagus pot and mix well, adding salt and pepper to taste.  Serve and enjoy.

*One pot directions

I know this is unconventional, but that is just how I roll people…At this point (remember that we’re using a large pot here), drain the chicken, placing it on a plate, and keep warm.  In the same pot, add 2 TBSP of oil and roast the garlic 2-3 min.

Place the chicken and broth back in with the garlic and add extra broth or chicken bullion and water (enough to cover the pasta and asparagus about 5-6 cups total) directly to the pot with the chicken and bring to almost a boil.

Add the uncooked pasta, asparagus, 2 tsp garlic salt, 1 dash poultry seasoning and salt and pepper to taste.  Bring to a gentle boil, stirring often, and cook until pasta and asparagus are tender, 11-13 minutes.

Drain extra liquid and stir in the cheese and pine nuts.  Serve and enjoy.

Note: I love it this way because it gives the pasta a great flavor, making it part of the meal and not just “filler.”

Easy, Peazy Pizza Bread

If you’ve ever been in a hurry or just plain tired at night (always my issue), then you know that a home cooked meal can be a rather daunting prospect.  Have no fear.  This easy meal will be a crowd pleaser and will take almost no prep.  You can prepare your own pizza crust or use a store bought tube.

I believed I’ve mentioned that I tend to shoot from the hip in the kitchen, so I would be lying if I said I stick to the following ingredient list.  I made my own pizza sauce with a bit of pesto for a little extra pizazz, but store bought works fine also.  Adjust to your tastes as needed and have fun.

Pizza Bread

Ingredients

1 tube or homemade pizza crust

1 small pack of pepperoni slices

1/2 cup shredded mozzarella cheese

1/8-1/4 cup shredded Parmesan cheese

3 TBSP pizza sauce

garlic salt to taste

1 egg + 1 TBSP milk, beaten together for egg wash

cornmeal

Directions

Preheat your oven to 375 degrees and grease a cookie sheet, sprinkling with cornmeal.

Roll pizza dough on a counter top sprinkled with cornmeal, forming a rectangle.  Spread the pizza sauce on the dough, stopping 1 inch from the edges and top with cheeses and the pepperoni.  Sprinkle with garlic salt, if desired.

Pizza bread 3.jpg

Brush egg wash along the long edges and what will be the outside seam of your bread, then roll, short edge without egg wash first, into a log.

Place seam side down in the center of greased cookie sheet and brush the outside of the rolled bread with egg wash.  Sprinkle with garlic salt, if desired.

Place in your 375 degree oven for 25-35 minutes, until crust is golden brown.  Remove from oven, cool slightly, slice and enjoy!

Pizza bread 5.jpg

Pizza bread 6