Brat Sliders, a Home Run

The depression over the departure of our wonderful company still isn’t fading, but we press on.  At least we still have some of the fantastic food they left us to keep the memories fresh…and someone’s dirty boxer shorts.

Anyway, last night the boys and I realized, with horror, that we only had 4 of Chad’s amazing Sheboygan bratwurst left.  As it registered that some of us would only be able to eat 1, while some lucky person would have 2, a stare-down ensued, the likes of which hasn’t been seen since the climactic final moments of The Good, The Bad and The Ugly.  I had to think fast lest shots start firing.

See, our company also smoked a ham and we had intended to use the 48 slider buns we purchased to civilly eat said ham.  Sadly, the ham was also so delicious that something of a feeding frenzy erupted.  Buns and manners forgotten, we tore into the ham and that was that.

As I stared at my children, wondering how to end the standoff, I spotted the slider buns on the counter behind Daniel and inspiration struck.  What follows is a way to stretch those precious Chad brats, or an easy and delicious meal to end a long day.  The Good and Bad were quite satisfied and cleaned their plates with grins and ketchup on their faces.

The best part?  I have leftovers!
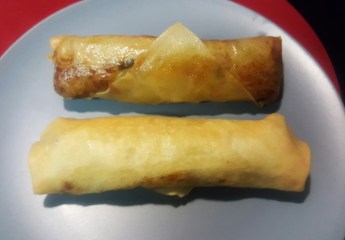
Brat Sliders

Prep & cook time: 5-10 minutes           Serves: 3-6
Ingredients
  • 4 large, or 6 small brats, cooked and cut into quarter rounds or bite sized pieces
  • 1/2 medium onion, sliced
  • 2-4 TBSP butter, or olive oil
  • 1/2 tsp dill, fresh or dried
  • 12+ slider buns
Optional
  • 1/4 cup sauerkraut
  • 1/4-1/2 cup shredded mozzarella
Directions
  1. In a 10-12 inch skillet, saute the onion in the butter or oil on medium high until clear, about 3-5 minutes.
  2. Add the brats and dill and heat until warm, about 2 minutes.  Add small bits of butter or oil, as needed, to keep moist.
  3. Add the sauerkraut and heat until warm, stirring to prevent sticking.
  4. Sprinkle with mozzarella and serve on slider buns topped with ketchup, mustard, etc.


Living Large in Louisiana

Let me apologize for the two day hiatus, but I can’t wait to show you why I went silent…

For the last few days (not nearly enough) my boys and I had the honor of playing host to my friend Jody and her wonderful family.  Seriously, guys, her boys are the kind of young men I hope that I am raising mine to be.  Anyway, like most parents with busy lives, having out of town guests gives us the opportunity to do and see the things in our own back yard that we neglect to otherwise make time for.  It was wonderful.  Here’s the rundown:


The first day we had to do a crawfish boil and Jamie knocked it out of the park again!  20160326_183311

The whole visiting gang loved them and took home all required seasoning to have their own boil at home.

Day 2 we headed to the Evangeline Oak in St. Martinville, where Longfellow’s Evangeline waited for her love, and then we were off to the Lake Martin Bird Sanctuary.

Day 3 we took our little boat into the Atchafalaya Basin, the largest swamp in the USA, so the boys could fish and we could take in the beauty of our wildlife here in Louisiana.

We finished up at Gator Cove with a delicious meal and their amazing “pets.”

Day 4 we headed to Avery Island and toured the Tabasco Factory and the Jungle Gardens.  It was beautiful and I finally got to see a river otter up close!  Sadly, he was camera shy and ran across our path so fast, but he was huge and gorgeous!  I am a huge bird nerd, and we have one of the greatest collections on Earth.  Jungle Gardens plays host to many of them.

Last night they cooked us some fantastic brats that her husband, Chad, made himself and they were amazing!  I didn’t get pictures because I was too busy eating.

It was a wonderful visit and I can’t wait to do it again!  It’s good to remember all of the things that Louisiana has to offer and it’s great to be blessed in friendship!  It’s also very refreshing to host kids who love the outdoors and aren’t sneaking off to play video games all of the time.  It was a good thing for my kids to be with other guys who share their outdoor interests and reminded them to hang on to them.

I just can’t say enough about how invigorating a visit theirs was.

Here are a few more pictures of what Louisiana gave us and what my awesome Wisconsin friends brought me…


Have a Fantastic Day!

I’m going to be brief today.  If you celebrate the resurrection, reflect on the life we are given and enjoy your loved ones.  If you don’t celebrate the resurrection, enjoy your loved ones and the good things in life.

I am putting my phone down today!  It’s going to be rough, but I can do it.  I need to bask in the warmth of my family and count my blessings.  Plus, you guys aren’t going to be playing in the kitchen today.  It’s all business for a holiday, isn’t it? :-/

Enjoy this amazing day and try not to choke any relatives.  Thank you so much for following me!

Image result for easter pictures   Image result for easter pictures

Image result for easter pictures


They Call Me Tater Salad.

As I mentioned in Thursday’s post, you can’t do gumbo without potato salad, so I aim to keep my promise and share this tasty side.  This is a recipe I picked up from my cousin, Lore, and ran with.  I’ve never had anything as good as hers, but we’re getting closer.

I know the pickle juice sounds strange, but you can substitute with 1 TBSP of white vinegar, if needed. Potato Salad 3 We “import” the best pickles from Wisconsin and I use every drop of the jar I can.  Actually, our friend Frank brings them down by the case whenever he visits.  God bless him!

I love this potato salad warm, but it’s also wonderful chilled.  This is another recipe I’ve never tried to write down, so play with it as needed.  Just remember that the egg mixture will be greatly toned down when mixed with the potatoes, so don’t be scared of bold flavor.

I am constantly adding to and playing with this recipe.  Luckily, potato salad is very forgiving, so have yourself a little fun.

Potato Salad

Ingredients
  • 8 Medium potatoes, peeled and cut into bite size pieces
  • 6-7 medium/large eggs, just hard boiled
  • 1/2 cup Miracle Whip or mayonnaise
  • 1 & 1/2 TBSP prepared mustard
  • 1/2 tsp salt
  • 1/2 tsp black pepper
  • 1 tsp or more Tony Chachere’s Creole seasoning
  • 1 & 1/2 TBSP dill pickle juice
  • dash of dill
  • a few drops of vinegar
  • 1/2-1 dill pickle, minced
Directions
  1. Boil the potatoes until just soft, 12-15 minutes, drain and set aside, keep warm.
  2. Cut your hard boiled eggs in half and place the yolks in a medium mixing bowl,
    Potato Salad 5
    Yolk mixture

    setting the whites aside.  Add the Miracle whip or mayo, mustard, salt, black pepper, Tony’s, pickle juice, dill and vinegar to the yolks and beat with an electric mixer until creamy.  Season to taste, if needed and add the minced dill pickle.

  3. Dice or mince the egg whites, putting half in with the potatoes and half into a bowl for later garnish.
  4. With a wooden spoon or soft spatula, mix half of the whites and the yolk mixture with the potatoes and stir to coat all potatoes evenly.  Top with extra whites, chopped green onion, yellow onion, chives, paprika, etc.

Potato Salad 6


SHN Nominated for the Liebster Award!

3and3quarters.net_.pngI was just nominated for the Liebster Award!  Since I’m so new to the world of blogging, I had to do some research to find out what this meant and it turns out that this is an award given by bloggers to other bloggers to help spread the word about up and coming new blogs.  In German Liebster means sweetest, kindest, nicest, dearest, beloved, lovely, kind, pleasant, valued, cute, endearing, and welcome.  I am so blessed and excited to be recognized.

Thank you, Taylor from  Peas Romaine Calm  for the nomination and for your patience with me in getting this post together.  It is very encouraging and a total honor to be recognized by your distinguished peers!  I guess I better bring my A game!  I sure hope I’m doing this right.

The rules of the Award:

  1. Thank the person who nominated you and link back to their blog.
  2. Copy and paste the Liebster Award badge to your post.
  3. Nominate 10 new bloggers.
  4. Answer the 10 questions the person who nominated you asked you.
  5. Create 10 new questions to ask the bloggers you nominate.
  6. Notify the bloggers you have nominated by leaving them a comment on their blog.

My Nominees:

The answers to the 10 questions I was asked:

  1. How did you pick your blog’s name?  Well, I love learning to build things around the house, organizing, cooking and eating, growing my own food, to laugh and all things nerdy (Comic Con, SciFi, the whole shebang) and I agonized over how to convey my interests.  Since we moved closer to town and I was trying to gain self-sufficiency in the ‘Burbs, the name was born.
  2. Describe yourself in three words.  Fun, resilient and resourceful.
  3. What is your guiltiest pleasure?  Clearly, food.
  4. What single quality do you most appreciate in people?  The ability to speak and understand sarcasm.
  5. What’s your favorite post that you’ve written? (Link, please!)  This is hard…maybe Saturday Crawfish Boil.
  6. Where do you get your inspiration to write?  My life, my kids, my kitchen, this world.
  7. What is your all time favorite type of cake?  I’m going to go with Ho Ho Cake.
  8. Would you still blog if you knew nobody was going to read it?  I do believe I would.
  9. What’s your favourite (non-blog) website?  Sadly, I log a lot of miles on IMDB.com
  10. If any Hollywood star, dead or alive, could play you in a movie of your life, who would it be?  A few years ago I would have said someone like Jayne Seymore, but if I keep eating like this, I’m leaning toward Melissa McCarthy and I’m okay with that.

My 10 Questions to my Nominees:

  1. What made you start your blog?
  2. Who is your greatest inspiration?
  3. What quality do you think your readers most admire in you?
  4. The best post you’ve ever written is…
  5. Do you think you’ll ever retire from blogging?
  6. What is the best book you’ve ever read?
  7. What is something few people know about you?
  8. When is your favorite time of day to write?
  9. Why do you blog?
  10. The song which best describes you and your blog is…

Please tag me in your post after you finish so I can see everyone’s answers!  Thank you to my followers and for nominating me.  I hope I can measure up and bring a little entertainment into your lives!

giphy.gif


Gumbo 101-Bo…or something like that

My Louisiana family may have to unfollow me or unfriend me on Facebook after this one, mostly just because that’s the only title I could come up with.  Everyone who’s tried it, loves my gumbo, but it’s a little different than the traditional.  Mine is a tad thicker, closer to stew, and I cook it longer.  It’s not because I don’t love traditional gumbo, but I have never been able to pull off the right, thin final product.  Gumbo, like chili, is one of those meals that tastes even better the second day.  I have found that cooking it a little longer, you give it that second day flavor.  Over the years my guys and I have really fallen in love with this recipe and even prefer it.


Wanting to share this comfort food with you, last night I did something that I have never even considered doing; I wrote down my gumbo recipe.  It was a huge challenge, and you who also shoot from the hip know, that never making things the same way twice causes a little stress when asked for the recipe.  I think I came up with something and I have to say that it was pretty darn good and right on target.  This isn’t a difficult recipe, but it does require a little work and diligence.  Oh, and it’s mandatory to serve this with fresh made potato salad.  Recipe tomorrow.

A couple of notes: I always thought I hated okra until I stumbled on a way to bake it with salsa, Rotel and Tony’s.  It’s perfect in a gumbo.  Canned okra and tomato variations are available in most grocery stores if you want to it, but it is not necessary in this recipe.

Additionally, we love gumbo file (pronounced FEE-LAY).  This is simply dried and ground sassafras leaves sprinkled over the gumbo during or after cooking.  So delicious, but also not mandatory.

Finally, though most people will use the fancy smoked sausage, I am partial to the skinless.  Don’t get me wrong, I love the good stuff, but I also love the softer texture and the way the skinless sausage soaks in the flavor.  Any smoked sausage will do however.

Let me know what you guys think!

Gumbo

Prep Time: 15 minutes          Cook Time: 1.5-2 hours          Serves: a small army
Ingredients
  • 1 & 1/4 cup flour
  • 1/2 cup olive oil (vegetable oil is the traditional oil)
  • 2 onions, chopped
  • 2 bell peppers, chopped
  • 2 celery stalks, chopped
  • 3 garlic cloves, chopped
  • 2-3 chicken breasts, cubed
  • 2 lbs smoked sausage, cut into bite size pieces
  • 2 + quarts water
  • 2 tsp garlic salt
  • 1/2 tsp black pepper
  • 2 TBSP Tony Chachere or other creole seasoning
  • Cooked white rice
Optional
  • Okra
  • 1-3 tsp Gumbo file, additional for table use
  • A bottle of wine, easily accessible during the first 30 minutes
  • An assistant to help stir
Directions
  1. In a large black pot (Dutch over) or stock pot, heat the oil and flour on medium high heat, stirring constantly.  Continue to cook and stir for 25-30 minutes, until the roux is the color of coffee with a touch of cream in it (have back up standing by to relieve your sore arm and have your meat and veggies prepped.  Pour a glass of wine).  DO NOT leave the roux unattended as it burns very quickly.  Hence, the constant stirring.
  2. When the roux is ready, add the chopped onion, bell pepper, celery and garlic.  Stir for 1-2 minutes. Gumbo
  3. Add the 2 quarts of water, garlic salt, black pepper and creole seasoning and bring to a boil. Continue boiling, stirring occasionally for 10 minutes (Top off your wine and wipe your brow).
  4. Add the cubed chicken and reduce heat to medium low.  Simmer for 20 minutes (Top off your wine).
  5. Add the cut sausage, file and okra and continue cooking on medium low, stirring occasionally, for an additional 30-45 minutes, until the flavors blend and the vegetables are totally softened (Top off your wine).
  6. Add water as needed to prevent over-thickening.

Serve over cooked rice with extra file and a side of potato salad.  Or serve your potato salad in the same bowl as it often done in Louisiana (Top off your wine and collapse into a chair, letting the applause wash over you).


Shlemiel, Frittata, Awesome Breakfast, Incorporated!

We’re gonna’ do it!

Give us any egg, we’ll break it,

Read a recipe, we’ll bake it,

Our culinary dreams come true,

Learnin’ the hard way!..

Sorry, couldn’t help myself and words that rhyme with frittata are hard to come by.  I’ll be singing this all day.

Happy Hump day, my friends!  I realized today that, with Jamie on the road, I have a frittatasurplus supply of eggs and it was time to have a little fun.  I also have a ton of broccoli for some reason, so I decided to go Italian and make frittata.  Delicious!  My kids, including Daniel, the broccoli hater, were actually fighting over the last piece.  It was a sight to behold.

Anyway, it’s very easy and I finished it on the stove top, so no messing with the broiler.  Like a regular omelet, this is a great way to clean out the veggie drawer in your fridge.  The best part is that you don’t have to fold it!


Basic Frittata

Serves: 4-ish (or 1 piece for me and the rest for my 2 boys)
Ingredients
  • 1 TBSP olive oil
  • 1 clove garlic, minced
  • 1/4 cup chopped onion
  • 1/2-3/4 cup chopped broccoli, or other shredded/diced veggies (frozen veggies work too)
  • 4-6 eggs
  • salt and pepper to taste
  • 1/2 cup black olives, sliced or diced
  • 1/2 cup shredded Italian blend or other shredded cheese (I went part Parmesan and part mozzarella)
Directions
  1. In a 10 inch skillet, heat the oil and saute the garlic, onion and broccoli, or other veggies, on medium high heat, until crisp-tender, 5 minutes or less.  When done, spread them evenly across the bottom of the skillet.  Sprinkle the olives over the veggies in the skillet.
  2. Beat the eggs well, adding salt and pepper (and of course Tony’s for us) to taste, then pour slowly over the veggies in your skillet.
  3. Sprinkle the cheese over the eggs and reduce heat to medium low.  Loosely cover your skillet and as your eggs thicken, periodically remove the lid and gently lift the edges of the eggs with a spatula, allowing the liquid to run underneath.
  4. Cook until eggs are set, minding they don’t burn, for 7-10 minutes.

    frittata 3
    It’s even pretty upside down.

Traditionally, you would finish in a broiler, but it’s much easier and still delicious to simply cover the skillet loosely.  Fewer dishes make for a happy parent.


“Luke, I am Nacho Pizza”

So, what does the average person do with a terrible cookie icing utensil that has never worked properly?  Throw it away, of course!  What does a nerd mom do with said cookie icer?  Make Darth Vader magic for her kids by filling it with sour cream and decorating a celebratory pizza.

Let me give you a little backstory: for the last several months my oldest son has been dealing with the worst kind of bully.  This kid has called him the foulest sort of names, shoved and hit him, called his sexuality into question before others, called him fat (he’s not), told him that his bio parents only gave him up for adoption because he’s ugly (most certainly not true) and told him he was going to be returned because of said ugliness.  As a parent, this is the worst thing to watch your child suffer through, but he’s at that age where I can no longer rush in to fix it for him.  While I did email a teacher and tell him to secretly keep an eye on the situation and said the same to a couple of other teachers, I didn’t want my son also branded a tattle tale.

My young man is stoic, almost to a fault, however, and greatly downplayed the ongoing situation, so I didn’t know the extent of what was still happening.  His bully was slick and never got caught.  I say “was” because yesterday my young man finally had enough and took care of business, laying this kid out and going from the shy, quiet kid to the school hero in an instant.

We don’t condone violence in our home and never encourage our kids to fight, but we do tell them that, without any other options, you defend yourself. And that’s just what he did.  I couldn’t be prouder, and to celebrate his act of heroism, my fancy-schmancy nacho pizza became all his.

And that is how my normally eye and taste bud pleasing nacho pizza became a little less pretty, but a whole lot cooler.

You can do this several different ways, but I went all from scratch last night.  I made the giant corn tortilla and the meat, but you can substitute store bought tortillas and a taco seasoning packet with your ground beef in a pinch.  I’ll use the store bought corn tortillas here, but will post the homemade tortilla recipe shortly.
This one is so delicious!

Loaded Nacho Pizza

Oven: 450°

Ingredients
  • 1 lb ground beef
  • 1 TBSP olive oil
  • 2 cloves garlic, chopped
  • 1/2 small onion, chopped
  • 1 jalapeno pepper, seeded and chopped
  • 1 tsp salt
  • 1 1/2 tsp chili powder
  • 1 1/2 tsp ground cumin
  • 1-2 tsp cayenne pepper (to your heat preference)
  • 1 can black beans, drained and rinsed
  • 1/4 cup salsa
  • corn tortillas, enough to cover the bottom of a pizza pan
  • 1/4-1/2 cup prepared nacho cheese
  • 1-2 cups shredded taco blend or other cheeses
  • Lettuce, tomato, olives, sour cream, etc. for garnish
Directions
  1. Heat the olive oil in a skillet over medium high heat and add the onion, jalapeno and garlic.  Cook for about 2 minutes, then add the ground beef.  Brown the gr. beef, then drain.  Add the salsa, chili powder, cumin and cayenne.  Cook and stir for about 5 minutes, then add the black beans.  Reduce heat to medium low, stirring occasionally until the beans are warm, 3-5 minutes.
  2. Grease a 16 in round pizza pan or an 11 X 17 inch cookie sheet and line with tortillas.  Bake in a 450° oven for 5-7 minutes, until tortillas are warm and slightly browning, turning over if necessary.
  3. Remove the tortilla pan from the oven and spread the nacho cheese all over the tortillas, as you would with regular pizza sauce.  Sprinkle the shredded cheese over the pizza and then sprinkle the meat and bean mixture over the cheese (you may only want to use 1/2-1/3 of the meat mixture and save the rest for tomorrow night’s awesome burritos or nachos).
  4. Bake in your 450° oven for 6-8 minutes, or until all the cheese is melted.
  5. Remove from oven and top with lettuce, tomato, sour cream, etc.
  6. Serve with forks and enjoy! Nacho Pizza.jpg


First Day of Spring Rolls

I think it’s time to pull out the big guns.  Today we’re talking spring rolls.  This is another one of those recipes that is cause for celebration around these parts.  Normally, I can make 50 of these and they won’t last more than 24 hours, but I was a good girl this time.  I made 25 and froze the remaining mix for later use.  The disappointment eventually faded since I pacified the gang with apple chips, which are sadly gone now as well.

Like all of my recipes, I play with this one a lot.  I will add extra soy and fish sauce to give a little more flavor to the filling.  I would recommend using about half of an 8 ounce package of rice sticks, but sometimes I will put a little extra into the mix to stretch it.

We like the traditional method of rolling the cooked spring rolls into a leaf of lettuce topped with cooked rice sticks, shredded carrot and cucumber.  This offers a wonderful variety of texture and refreshing crunch, but you don’t have to do this as they stand alone just fine.

20160318_193333-1.jpg

Spring Rolls

Ingredients
  • 1 lb ground pork, cooked
  • 1/2 lb shrimp, chopped and cooked
  • 2 small carrots, diced
  • 4-5 shiitake mushrooms, diced, no stems
  • 1/4 cup soy sauce + extra
  • 1/2 tsp sugar
  • 8 oz pack Cellophane noodles or rice sticks, cooked
  • 1 egg, white and yolk separated
  • 2 cloves garlic, minced
  • 6 sliced green onions
  • 1 tsp sesame oil
  • 1/2 tsp black pepper
  • 1/2 head cabbage, shredded
  • 1 pack 8 inch spring roll wrappers (make sure they are the kind used to fry, not for raw spring rolls)
Optional
  • 1 tsp rice vinegar
  • 1 TBSP Fish sauce
  • Romaine lettuce leaves
  • Shredded carrot
  • Julienned cucumber
Directions
  1. Blanch cabbage and place in an ice bath.  Drain and then squeeze out water.  In a large bowl mix cabbage, carrots, mushrooms, garlic and gr. onions.
  2. Mix the chopped, cooked shrimp, cooked pork, soy sauce, sesame oil, sugar, black pepper, fish sauce, rice vinegar, about half of the rice sticks and egg white well.  Add to the vegetable mix (I usually mix it all together in one bowl, but these were my original directions, so I leave it to you.  Less dirty dishes make me happy). 20160318_173714-1.jpg
  3. Brush egg yolk on three corners of a wrapper, then add 2 TBSP of filling in the center, diagonally.  Place a wet towel over any wrapper or spring roll not in use to keep moist and prevent breaking during the frying process.
  4. Deep fry in peanut oil at 350° for 4-5 minutes, flipping half way, until golden brown.
  5. Serve wrapped in lettuce with the extra noodles, cucumber and carrots, or alone.  Dip in oriental chili or soy sauce.

Scroll down for directions and a short video on how to fold spring rolls.


Fruit Chips: Let the Deliciousness Flow Through You!

Good afternoon, all!  Getting a little bit of a late start because I finally got my husband home last night.  I’m thinking weekends may have to be quick and easy posts so that Jamie can get a little attention during the 36 or so hours I’ll get to see him for the next few months.

As you know, I am recovering from a super fatty food run and on the lookout for new snack items to feed my hungry gang and myself, so this week we remembered how much we love fruit chips.

There is almost no fruit that can’t be dried, but we went with mango, apples and bananas.  You can do these in a food dehydrator or an oven and they are an easy, delicious snack.  Because fruit isn’t exactly bursting with flavor this early in the spring, I used lemon juice and cinnamon sugar on my chips.

I’ll break this down into three separate recipes since I’m giving oven directions and temperatures vary, but you can tweak it depending on the fruit you choose or whether or not you use a dehydrator.  I also recommend dipping your fruit in, or brushing it with, lemon juice to enhance the fruit’s natural flavor, but it’s not mandatory.

Apple Chips

Oven: 225°       Prep time: about 10 minutes        Cook time: 45 min-1 hr       Serves: 4 (for about 10 minutes in this house)
Ingredients
  • 4-6 apples, peeled, cored and thinly sliced (a mandolin works great)
  • Lemon juice for brushing
  • Cinnamon sugar, if fruit is not sweet enough
Directions
  1. Arrange apple slices on a baking sheet and brush with lemon juice.
  2. Sprinkle with cinnamon sugar and bake in preheated oven until edges are dry and begin to curl, 45 minutes to 1 hour. 20160310_174916 - Copy

Banana Chips

Oven: 200°       Prep time: 10 minutes      Cook time: about 3 hours      Serves: 2-4
Ingredients
  • 2 bananas, peeled
  • Lemon juice
  • Cinnamon sugar

Directions


  1. Peel bananas and slice into 1/4 inch slices.  Place on a greased cookie sheet and brush with lemon juice and sprinkle with cinnamon sugar.
  2. Bake, turning over once, until golden brown and crispy, about 3 hours.

Wickett - Copy

Mango Chips

Oven: 185°, or lowest available oven temp        Prep time: 10 minutes      Cook time: 2-3 hours      Serves:  2-4
Ingredients
  • 2 ripe mangoes
  • Lemon juice
  • Sugar, or cinnamon sugar
DIRECTIONS
  1. Wash and peel mangoes, then cut into thin slices.
  2. Place on a greased cookie sheet, or line a cookie sheet with a silicone baking mat.
  3. Brush mangoes with lemon juice and sprinkle with sugar, if desired.
  4. Bake for 2 to 3 hours, turning them over every 30 minutes or until they’re dry.