

Yes, it’s official. I’ve been sucked into the kitchen far too often lately and I have lost my mind. Initially, this blog was going to be a recipe here and there kind of deal, but now I’m cooking and making things I haven’t in years. Today, for example, I have a sick child home from school and have decided on soup and grilled cheese for dinner, but in order to keep the recipe momentum going, I dug up one for something I haven’t made in over 20 years.
Ho-Ho Cake is basically a giant Swiss Cake Roll and was really easy to make and safe to eat when I was in my late teens and early twenties, but now maybe not so wise for my 42-yr-old metabolism. Did this knowledge stop me?
No way! I love this cake and even though it was a bit of a challenge and I’m now going to have to eat lettuce for a week, I have to share this one. The filling tastes just like the real stuff and IT IS SO GOOD!
I’m going to take you on a ride through one woman’s struggle to make a delight of her youth after a 20+ year hiatus. Be sure to read my account of what actually went down after the real recipe.
Ho-Ho Cake
Servings: a small village Prep time: Who cares? It’s a giant Swiss Cake Roll!
Cake Ingredients
- 1 box Chocolate or Devil’s Food cake mix and for that:
- 3 eggs
- 1 cup water
- 1/3 cup oil
Filling Ingredients
- 3 TBSP flour
- 1 & 1/4 cup milk
- 1 cup sugar
- 1 tsp vanilla
- 1/2 cup Crisco
- 1/2 cup butter, softened
Icing Ingredients
- 2 small packages unsweetened chocolate chips, melted
- 1 egg
- 1 stick butter
- 1 tsp vanilla
- 3 cups powdered sugar
- 2 & 1/2 TBSP hot water
Directions (what you’re supposed to do)
- Prepare your chocolate cake mix and bake at 325 degrees for 20-25 minutes on a lined or greased 10 X 15 inch cookie sheet. Cool completely. Remove carefully to wax paper.
- 2. For the filling: Mix the flour and milk in a sauce pan and cook, whisking or stirring constantly, until thick. Cool completely and add the remaining filling ingredients, beating at high speed for 5 minutes. Spread on cooled cake and refrigerate for 1 hour.
- For the icing: Beat all ingredients until smooth and spread about 1/3 of the icing on the chilled cake, placing a thin layer on top of the filling.
- Carefully, roll the cake into a log, using the wax paper to lift and being careful not to roll the paper into the cake. Use the remaining icing to frost the outside of your rolled cake. Chill to set, then slice and enjoy!


Directions (what I ACTUALLY did)
- Yep, got that right and even took my cake trimmer and made it perfectly level. Don’t do this. You’ll see why.
- Yep, got the filling perfect and everything was tasting and looking pretty good at this point.
- For the icing: I realized I had no unsweetened chocolate chips and with a sick child at home, I wasn’t going to the store. No problem, I had some store bought chocolate frosting I could use. Why not? I’ll tell you why not in a second. I spread a little of the frosting over the filling and we were off to the races.
 Level and loving it!
 Masterful filling!
 Frosted like a boss!
 - Now to neatly roll my perfect rectangle into a log. Ever so carefully, I lovingly rolled that beautiful thing up into a photo-worthy masterpiece! It was breathtaking!..until it cracked because I just haaaadd to shave it level and the cake was now too thin to hold up. I contemplated keeping this little secret and showing you only the final product, but I’m letting you in here, people. This is the real story.

Wait!!! WTH happened here?
There was still hope at this point, 1 cup chocolate chips mixed with 2 TBSP coconut oil makes a great “Magic Shell” frosting, but a little whipping cream and an extra dab of coconut oil could give me chocolate spackle!
Now, to grab the double boiler and melt the chips and coconut oil (microwave doesn’t work so well for me), but BLAST! No double boiler in sight (The problem with kids emptying the dishwasher over here is that the dishes only make it to their designated area about 65% of the time). No problem, I totally MacGyvered it!


I tried spreading my store bough frosting, but it just ripped more of the cake off, so I filled the holes with a cake decorating tip and bag of said frosting. I put this eyesore in the freezer for about ten minutes, not even able to will myself to photograph its hideous visage.
When my spackle, I mean, chocolate drizzle was ready, I set to work trying to save the disgusting log thing. I used a rubber spatula and tiny cake decorating knife and managed to smooth things out pretty nicely. Sure, it’s a little shiny and resembled a chocolate poo from a distance, but it was presentable, in my opinion. I took some lovely pictures and almost used one as the featured image until I realized that it shows you just how much chocolate filler I used…I present to you:
CHOCOLATE SPACKLE WITH FROSTING AND A DASH OF CAKE!
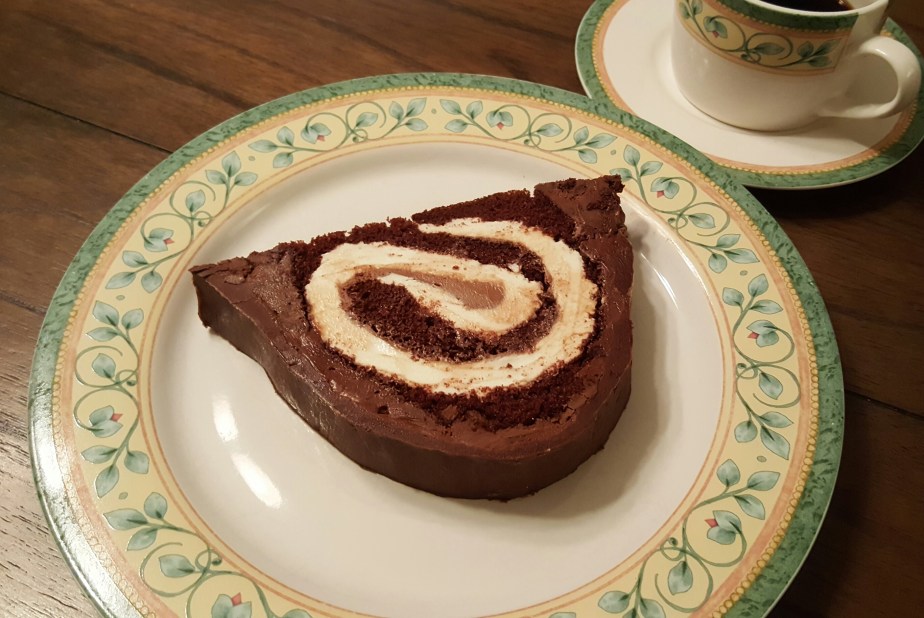
You know what though? It’s darn good. Sure, I can only eat a quarter of a slice without risking diabetes, but that’s healthier, right? Plus, one slice will last like three days and the rest freezes like a champ!
The moral of the story? Just follow the main directions and you should be okay. In fact, unless you’re not the klutz I am, just serve as a sheet cake. Just kidding, your friends and family will love this. It’s really not difficult…unless you are me and we’ve all seen how well my cakes work out.
Be sure to click the “follow via email” link on the right so you never miss a post! Thanks, guys!

One thought on “Ho-Ho Cake, HAHAHAHA!”