SO EASY Succulent Poached Salmon with Béarnaise Sauce

I have a confession to make…I’m a little scared of eating fish.  I used to love it, but I had a bad experience and have since gone into every fish eating moment with fear, expecting that overpowering fishy taste or to chomp down on a bone.  Since I know it’s good for us, I force myself to make it but I am always on the lookout for recipes that make fish less fishy.  I love Jamie’s fish fry and there are certain fish I can really enjoy, like grouper and tuna, but the mental block has been the worst.

I finally stumbled onto something that the whole family can enjoy and the sauce is fantastic.  I mean, fan-freaking-tastic, people!  I always double the sauce recipe, as my photos prove, and I am not ashamed.  I’ll do it again.

You probably have most of the short ingredient list on hand, so let’s hop to it!

Poached Salmon with Béarnaise Sauce

Servings: 4, unless you live with Andrew and he eats 3/4 of the entire dish.
Prep time: 5 min.                                                                   Cook time: 8-10 min.
Ingredients
  • 1 cup water
  • 1/2 cup white wine (dry is best)
  • salt and pepper to taste, if desired

Béarnaise Sauce:

  • 1/4 cup mayonnaise or Miracle Whip

    Bearnaise.jpg
    The secret’s in the sauce!
  • 2 TBSP lemon juice
  • 1 TBSP Dijon mustard
  • 1 tsp sugar
  • 1 tsp tarragon, fresh minced or dried
  • salt and pepper to taste

In a skillet, bring wine and water to a simmer (add salt, pepper and a dash of Tony’s, if you like), then add the salmon.  Cook without boiling for 8 to 10 minutes or until steaks flake easily with a fork.  Remove from skillet, divide steaks and keep warm.

In a small saucepan, while the salmon simmers (very poetic, don’t you think?) combine all the sauce ingredients well with a whisk.  Cook over medium low heat without boiling, whisking until warmed through.  Season with salt and pepper to taste and serve over salmon.


Heavenly Pesto Olive Chicken, Super Easy and Fast

Well, it’s raining again, though thankfully the wind has let up because I was worried about my chickens ending up in Oz.  Being stuck inside means I have lots of time to play in the kitchen and boy, have I!  Last night’s dinner is a favorite around these parts and it is so easy, it will blow you away.  My mushroom hater and pesto skeptic both did a little dance around the kitchen for this one, proving my theory that anything can be hidden under cheese if you play it cool enough and make it taste yummy.

I halved the recipe since it was just the boys and me, but a little does go a long way with this rich, yet not overpowering dish.  I would not cut the recipe in half again, however because there was much sorrow when they realized there would be no leftovers for tonight.  Pretty high praise when Friday nights are usually “Fantastic Family Night” in our house.  This means a favorite dish and a movie or board game, usually followed by popcorn and whatever crazy snack I throw together.

Next time you get home late and crave a little gourmet food on fast food time, this is the ticket!  Let me know what you all think!

Pesto Olive Chicken with Mushrooms

Prep time: 5-10 minutes (most of this time spent fighting plastic wrap)           Cook time: about 17 minutes
Ingredients

4 boneless, skinless chicken breasts

1/2 cup prepared pesto

4.5-12 oz canned, sliced mushrooms (2 little cans or 1 big one)

1 small can chopped olives

1 cup shredded provolone cheese (you can substitute with mozzarella, parmesan, etc.)

Garlic salt, pepper, Tony’s etc. to taste

Directions

Place the chicken breasts between 2 pieces of plastic wrap, leaving plenty of room around Pesto Olive 3.jpgthe edges for the chicken to “spread,” and flatten with a meat mallet until 1/3 – 1/2 inch thick.

Place the chicken in the bottom of a 13 X 9 baking dish and cover with the pesto, spreading evenly.  Sprinkle with garlic salt, pepper and Tony’s, if desired, to taste.  Top with mushrooms and then olives.

Bake, uncovered at 400 degrees for 15 minutes.  Remove from oven, sprinkle with cheese and then return to oven for an additional 2 minutes, until cheese is melted and chicken juices run clear.

Serve, sit back and bask in the glory.


Spice and Produce Aisles? Where We’re Going, We Don’t Need Spice and Produce Aisles.

Boy, I sure played with that title for a while.  Hard to talk about growing your own herbs without misleading the people.  Any-hoo, I thought we’d talk a little “Homesteadin'” today since I can’t bring myself to look at food just yet, not after the last few weeks.  Additionally, we have had sustained winds reminiscent of hurricanes past and I need something to distract me from the crystal clear pool I cleaned a few days ago which now looks like this:

messy pool.jpg
I was regularly scooping leaves like a champ, in a constant hail storm of leaves, but finally tossed the net in defeat.  Mother Nature: 37, Allison: 0

“15 beautiful live oak trees on the property will be a blessing,” they said.  Hmm.

The Goal: grow more of my own herbs.

Clearly, if you’ve read a few of my posts, you know I love me some seasoning and don’t do well with boring food.  This can get a wee bit pricey and you end up with a spice storage system slowly taking over your kitchen.  Observe: All Spice.jpg

So maybe I have a small spice hoarding problem, OOORRRRRR, maybe I love to try new things and you’re just jealous.  Don’t judge me!

Oops, sorry.  Where was I?  Oh, yeah…so a few years ago I stated thinking that I really needed to figure out how to increase my herb production.  I mentioned that I have battled plague after plague since gardening in Louisiana: stink bugs, caterpillars, slugs, stink bugs, weird little trail leaving things that look like poop, slugs and so much more, so I was starting to feel a little defeated.  Had my green thumb gone full black after coming back to LA from Colorado?

Thankfully, Jamie got me a little greenhouse at Harbor Freight Tools last year for a decent

Garden

price.  It needs plastic wrap around it to keep the panels from blowing off in the wind (seriously), so I vow to get out and silicone the panels should it ever stop raining or gusting.  Unlike everything else I was attempting to grow for a while there, my herbs all seem to thrive anywhere, but it was a great place to winter the surplus.

I also decided to grow a few of the things I use the most in pots in, or near, the house for easy picking and luckily, as I said, herbs and I do well together.

The Tools to Make Things Easier: dehydrator, mini chopper, mortar and pestle.

A few years ago I purchased an inexpensive food dehydrator,  Even though it only has 2 temps, which I can’t control (“Meh” and “Sweet Mary, it’s LAVA!”) and those stupid holes in the middle of the trays, I use it all the time.  I would strongly recommend getting one with the square trays and an adjustable temp, but if you are just getting your feet wet, go for the cheapo and rotate your trays a lot during dry time.  For me, it’s been a Godsend because I don’t seem to possess the patience to wait for herbs hanging to dry or drying in a low temp oven.  I also lack the memory to remember to use said dried herbs before they are cobwebby and full of dust.  I also suggest a mini food processor (for a larger end product like with thyme, basil and cilantro) and a mortal and pestle set (for fine, powdery grinding as with stevia or cilantro salt for chips) .  All three are great tools when drying, chopping and grinding your own herbs.

The Basics: growing and storing.

It’s really amazing to me how easy most herbs are to grow.  I have pretty small pots for a lot of mine and most have done fine in a window sill or on the patio.  I have learned to harvest seeds from my best producers and they all do fairly well.  It’s such a great feeling to walk over to your own plant and cut what you need when you have a recipe that calls for fresh herbs.  I hate running out of anything (obviously) and if you’ve priced some herbs in the store, you’d swear they grew in Middle Earth and were watered by Bilbo Baggins himself.

You really only need to worry about:

  • Adequate sunlight.
  • Adequate water.
  • Comfortable temperature.
  • Basic maintenance.

Luckily, plants come with cheat sheets and the internet is a vast wonderland of information.  Some of it is even true, I’m told!

I grow oregano, basil, cilantro, dill, stevia, mint, thyme, chives, green onions, parsley and more, but today I’ll focus on stevia.

Stevia is an increasingly popular sugar substitute and is a fairly easy plant to care for.  It likes sun and water, with regular leaf cuttings to promote growth.  Your best bet is to buy a seedling or small plant since the seeds can be tricky to start.  I purchased one of mine at Home Depot for less than $3 and have gotten several cuttings from that first plant started successfully.

Stevia has a few uses you may not be aware of.

  • When you buy it at the store, it may not be “all natural,” so growing it yourself, as with anything, can be a great and inexpensive alternative.
  • Stevia can be up to 200 times sweeter than sugar!
    • 1 tsp of stevia is roughly the equivalent of 1 cup of granulated sugar, so a little goes a long way.
  • Stevia can replace regular sugar in cooking AND baking, but it will not caramelize.

It is recommended that you dry the leaves out right after cutting and cleaning, but that you wait to grind them until you are ready to use them.  The leaves dry very quickly and I store mine in a tupperware container.  When I’m ready to use them, I grind them with my mortal and pestle, since it produces far finer powder than a food processor.

Yesterday’s haul was about 7 or 8 large cuttings, leaves stripped and placed in singleStevia 1 layers on 2 dehydrating trays.  I dried these for about an hour and they came out perfectly.

I put most of the dried leaves in a storage container, but ground a few to use right away. (this gives you more sweetness).


The few leaves above produced over 1/2 tsp of powder which I used to make lemonade with some mint I had on hand.  My boys loved it and it is amazing how well it works as a sweetener.  I haven’t used in in cooking just yet, but I’ll keep you posted.  I’ll admit that living in the land of sugar cane and coming from a family of cane farmers makes me rather loyal to the white stuff, but I’m going to try this!

There’s my 2 cents for today, just remember to grow what you love and use the most, start out small and save what you don’t use.  Easy, peasy and ALL YOURS.


Last Minute Pizza Crust

It’s been a long day and you are exhausted.  Ordering a pizza would be the easiest thing to do, but you almost feel guilty doing that.  Okay, I would because I’m weird about eating out.  I think most people who love to cook aren’t huge fans of letting a restaurant cook for them.  Plus, I spent 14 years in a field that overlaps with pest control, but that’s a disgusting story for another day.  Anyway, it’s getting close to dinner time, you want pizza, you have the ingredients, but if only you had a quick and easy crust…

I wanted to post this before the pizza recipe, but I was so excited about that one that I couldn’t wait.  So, by popular request, I bring you crust!

I know a lot of people don’t like to do their own pizza crust because they can take forever, but this one is fairly simple and really tasty.  The great thing is that you can also use whole wheat flour and the kids won’t know the difference.

Prep time is about 20 minutes, so it doesn’t get much easier than that.

Last Minute Pizza Crust

Ingredients

1 (.25  oz) package active dry yeast, or 2 1/4 tsp

1 tsp white sugar

1 cup warm water

2 1/2 cups flour

2 TBSP olive oil

1 tsp salt

cornmeal for dusting

Directions

In a medium bowl, dissolve yeast and sugar in water (not hot).  Let stand until creamy, about 10 minutes.

CBR Pizza.jpg
Yeast, sugar and water after 10 minutes

Stir in the flour, salt and oil, mixing until smooth.  Rest 5 minutes.

Turn dough out onto lightly floured surface, rolling and patting into a workable ball.

Roll or press onto a lightly greased baking sheet dusted with cornmeal.

Brush with olive oil and garlic salt, then bake at 450 degrees for about 5 minutes, or until slightly golden brown.  This will ensure your crust cooks through.

Remove from oven, spread with sauce, cheese and toppings.  Bake 15-20 minutes at 450 degrees until golden brown or as desired.

This crust can easily be stretched to make 2 thin crust pizzas, just be sure to adjust baking time to prevent burning.


Easy Chicken, Bacon, Ranch Pizza. Not Delivery.

Though I have every intention of making this blog about more than just food, it seems I am on a cooking roll right now, so I’m going with it.  I admit though, it kind of bums me out to think that, while I dressed like this for ComicCon last year:


If I keep up this cooking and eating pace, I’m probably going to have to go with one of these next year:


C’est la vie.  At least I’m keeping up my cardio and strength training (snicker, snicker).

So yesterday was the kind of day where I played in the kitchen all day.  I made some popcorn balls, tortilla chips and more fruit snacks and thought it was a pretty fine day…until I realized it was 5 pm and I hadn’t pulled anything out for dinner.  We usually eat at 6 and so I sprang into action!  Ok, not really, but I did decided to make pizza, a favorite around these parts.

I’m not a huge fan of pepperoni.  It’s not that I don’t like it, but it can be so greasy and my post-menopausal digestive system seems to handle it very poorly.  I have had to try several different alternatives and this chicken, bacon and ranch is a favorite.  In fact, when we sat down to eat last night, the conversation with my newly picky eater went like this:

“How do you like your pizza, Andrew?”

“Great!  Thanks for getting Domino’s, Mom!  This is their best chicken ranch I’ve ever had!”

“It’s not delivery, I made it.”

“No way!  I just can’t believe that.”

“Gee, thanks.”

“No, I mean, if you’re telling the truth, this is your best pizza ever!”

Then, when eating his third slice, “Did you not put jalapenos in it just for me?”

“There are jalapenos.  I just cut them up very small.”

“Wow.  I just can’t believe it.”

So either I’m usually not up to par in the kitchen with this guy, or I have finally mastered hiding things in food.  Whatever the case, if Andrew can sing this pizza’s praises, your picky guys will like it too.  I do this differently than most because of this new found picky phase, allowing me to hide the good stuff in the sauce under the cheese.

I’ll post the crust separately.

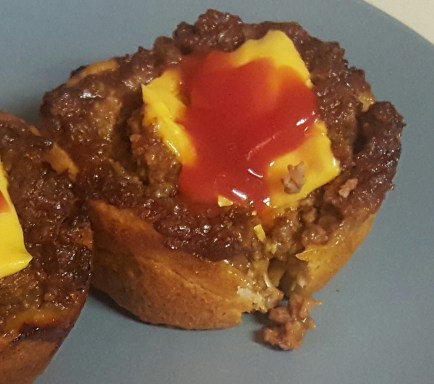
Chicken, Bacon and Ranch Pizza

Ingredients

1 pizza crust, refrigerated tube or homemade

1-2 boneless, skinless chicken breasts, cut into small cubes

2-3 slices of bacon, cut into “bacon bits” size

3-4 TBSP onion, minced

1 small jalapeno, seeded and minced

1-2 TBSP garlic, minced

1 cup ranch dressing

1-2 cups mozzarella

Salt, pepper and Tony’s to taste.

Directions

In a 12-14 inch skillet on medium high, fried the chopped bacon until crispy.  Remove from pan and drain, then set aside.

In the same skillet, using the bacon grease, roast the garlic until golden brown on medium high, stirring to prevent burning and sticking, about 3-5 minutes.

Add the onion and jalapeno and saute until the onion is clear, about 3-5 minutes, then add the chicken.  Cook until the chicken is no longer pink and the juices run clear, stirring often, about 5-7  minutes.  I will use my utensil to make the chicken pieces smaller while cooking.  Drain any liquid.

CBR Pizza 2.jpg

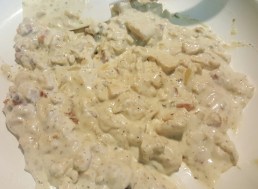
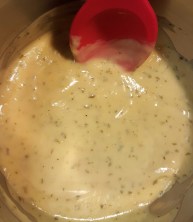
Add the ranch, salt, pepper, Tony’s and garlic salt, if desired, to taste.  Return the bacon, remove from heat and stir to combine all ingredients well.

Bake your pizza crust, spread on a pan greased and dusted with cornmeal, brushed with olive oil and sprinkled with a little garlic salt, for about 5 minutes in a 450 degree oven, until slightly golden (I abhor raw dough in my pizza) and then remove to counter.

Spread the chicken ranch mixture evenly over the crust and then top with cheese.  You can garnish with green onion, chives, cilantro, or whatever.

Return to oven and bake 15 minutes or until cheese is melted and crust edge is golden.
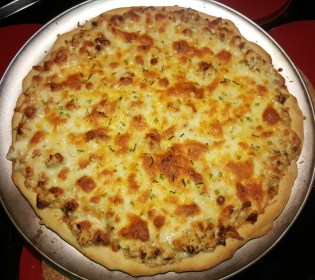
CBR Pizza 4.jpg

Slice and enjoy!

**********************************

For an easier alternative, you can use store bought real bacon bits and saute your veggies and cook the chicken in olive oil, but where’s the fun in that?

This recipe, my crust and all, can easily be stretched into 2 thin crust pizzas.

If you really want applause, sprinkle a little Tony’s over the top of the entire pizza.
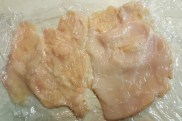


Cheeseburger, Cheeseburger, Cheeseburger Cups

So yesterday was Sunday and the day Jamie left for orientation.  I was feeling a little lazy which, I’m sure had nothing to do with the crawfish boil and accompanying beverages from the day before, and I really didn’t feel terribly inspired in the kitchen.  I’m sure that everyone has seen some variation of this recipe on social media, but this is one we’ve been using for a long time.  I think it came from Simple and Delicious magazine, authored by Jeri Millhouse and my kids go crazy over these.  I admit to being a big fan myself.

I’m also thinking I better work on some building and homesteading posts or I’m going to weigh 700 pounds by year’s end.  Anyway, it’s a really easy and tasty recipe.  Enjoy!

Cheeseburger Cups

Yield: 5 servings for people possessing self control, 2 or 3 servings for the rest of us
Ingredients

1 lb ground beef

1/2 cup ketchup

2 TBSP brown sugar

1 TBSP prepared mustard

1 1/2 tsp Worcestershire sauce

1 tube refrigerated buttermilk biscuits (not the giant ones)

American cheese, 10 cubes

Directions

Brown your ground beef in a skillet and then drain grease.  Stir in the ketchup, brown sugar, mustard and Worcestershire sauce, combining well.  Remove from heat and set aside.

Grease a muffin tin and press each biscuit into the bottom and up the sides of each cup.  Spoon the beef mixture into the cups and top with a cheese cube.

Bake at 400 degrees for 14-16 minutes, until golden brown.  Remove from muffin cups with a fork and cool slightly before serving (a lack of self control when contacting the delicious flavor will result in a loss of taste buds if you do not allow the lava hot centers to cool a bit.  True story).

CC.jpg
Photo credit: My youngest

Top with extra ketchup if desired and enjoy!

Saturday Crawfish Boil

It’s that time of year, people!  Time for me to impress my husband with my ability to inhale vast quantities of my favorite crustacean (I won his heart 17 years ago when I ate almost ten pounds on our first date).  Of course some of you may not be able to get your hands on this fantastic feast, BUT there are many places that will ship live crawfish if you are looking to give it a shot.

Join me as I walk you through a typical boiling day…well, we normally steam them.

Step 1

Decide the day before your husband is set to leave for a 2 week orientation class in Alabama that you need to have a crawfish boil.  Call your awesome crawfisherman cousin and get yourself a sack ordered.  Everybody split up and run for last minute items.

We went with:

40 lbs live crawfish

5 pounds potatoes

2 onions

3 lbs smoked sausage

liquid and powdered seafood boil seasoning 20160305_185228-1.jpg

Extra powder boil, Tony’s and Cajun Chef hot sauce for finish

A 20 pound weight

Step 2

20160305_124809.jpg

Open your first beer and get those crawfish purged in salt water.  Change the water, adding more salt, until it stays clear.  Chances are you’ll need a second beer at this point.

While the crawfish are purging, make sure your big pot is clean and fill with about 2 inches of water, liquid and powdered seasoning.  Place the lid on the pot with the 20 pound weight on top of it and turn on your burner.

Freak out and run to the store since you just realized that you are out of propane.

20160305_143353-1.jpg

Okay, now you’re back from the store, the new tank is connected to your burner and we’re on to the next.

Step 3

Realize that since there has been a steady influx of neighborhood kids into the house and yard all day, you totally forgot to prep your vegetables, buy sausage and make dip.  It’s time to run back to the store and buy that sausage.

Step 4

Okay, now you’re back from the store…again.  Make the dip after cutting the sausage and peeling the onions. 20160306_100641-1.jpg

Dipping Sauce Indredients

1 1/2 cups mayonnaise or Miracle Whip

1/3 cup ketchup

1/4 cup Cajun Power Garlic Sauce (a mild Frank’s-type sauce can work)

2 TBSP Tony’s

Mix well and adjust to taste.

Step 5

Open a beer, make sure your lid and 20 lb weight are on the pot, turn on your burner and wait for the steam to start escaping in wisps.  Add your veggies and sausage in a metal colander for easy removal.  Replace the lid and the weight and wait for the steam to start escaping again.  Set a timer for 10 minutes.

Remove the colander and add the live crawfish to the removable basket and place into your pot.  Place the veggie colander on top, then replace the lid and weight, taking care to avoid major, agonizing steam burns.  Should you sustain a major burn, open another beer and wait for the pot to start steaming again.  Set your timer for five minutes.

Step 6

When the five minutes are up, remove the colander and crawfish to a large, clean ice chest.  Sprinkle liberally with Cajun Chef Hot Sauce, Tony’s and some of the powdered seafood boil.  Coat by stirring and shaking cooler.

Realize that you normally don’t drink beer and that you might be a wee bit tipsy.  Switch to water for a while.

Step 7

Take a moment to briefly panic about how you’re going to feed the 14 people you see before you when you had only planned for 7.  Now relax.20160305_153802-1.jpg

Scoop liberal amounts onto giant plates or dump it all onto a table covered with a plastic table cloth or newspaper for easy clean up.  Feed all the stray kids who’ve shown up and then grab some for yourself.

Open a beer, place a roll of paper towels close by, get yourself some dip and commence peeling and eating.  DO NOT be alarmed by the zen-like peace washing over you.  Enjoy it while it lasts as it will quickly dissipate when you realize those freaking kids are cleaning out the ice chest!

Step 8

Realize that you have defied all odds and are now full, with leftovers in the ice chest.  Either peel the tails and freeze them or admit that the beer and food have made you lazy and that your best course of action is to bag the leftovers, jump on the 4-wheeler and deliver happiness to your neighbors.

Step 9

Kick back, relax and fill those coolers with soapy water until tomorrow.  Watch the sunset and count your blessings.

20160305_181140.jpg

Optional Step

After sunset, facilitate an impromptu dance party in the garage with 4 and 7-year-old girls.  Take great pride sustaining little to no injury from the cartwheels you didn’t know you could still do.


Make it all Better with Fruit Leather

Good morning!  As our week’s weather looms large and lousy, I’ve decided it’s time for a fruit roll up/leather marathon.  I am blessed to have kids who want to learn to cook and I think their wives will thank me one day.  Fruit leather is something my boys love helping with this and all of us love to eat it.

It’s easy and a healthy alternative to store bought, over processed snack items.  I also like

FL9
The fruit leather bandit caught red handed!

the idea of knowing whose hands have touched my food…unless you’re working with Andrew and forgot to remind him to wash his hands.  This can actually be quite terrifying since he’s 10 and can get pretty darn dirty.  Luckily, his almost 13-year-old brother, Daniel is there to play second mommy if I forget.

Anyway, you can use almost any fruit, but remember that with grapes, you would want to run them through a food mill.  The following is a recipe I’ve played with, but there is no truly wrong way to do this.  Sometimes we even do just straight applesauce.

Fruit Leather Straps

Ingredients

3 cups chopped strawberries

1/4 cup water

1/3 cup sugar

1 TBSP lemon juice

2 cups unsweetened applesauce

Directions

Place the strawberries and water in a saucepan and bring to a boil.  Reduce heat, cover and simmer for 10 minutes, stirring occasionally.  Remove lid and test fruit to make sure it’s softened and taste to determine sweetness so you can adjust your sugar as needed.

Mash the strawberries with a potato masher, or get sick of that and grab your immersion blender like I did, then add the sugar and lemon juice, adjusting for more or less sweetness as needed with the sugar, and to enhance the fruit flavor with the lemon juice.  Simmer on medium to medium-high for about 5 more minutes.

Add the applesauce and check your sugar and lemon juice once more.  Simmer an additional five minutes.

Remove from heat and prepare your trays, allowing the fruit mixture to cool slightly to avoid scalding burns which can dampen the pleasure of any cooking experience.

Line the trays of a food dehydrator with heat tolerant (microwave safe) plastic wrap.  DO NOT USE WAX PAPER.  You will be chewing papery gum or just have to toss it since the fruit mix will fuse to the wax paper.  Yes, I’ve done this at least three times.

Place a thin layer (1/8 to 1/4 inch) of the fruit mix onto the trays and run them in the dehydrator for a few hours, being careful not to burn.  The leather is finished when it is not soft to the touch or sticky and will peel right off the plastic wrap.

IF YOU DO NOT HAVE A DEHYDRATOR you can do your fruit in the oven.  Line cookie sheets with heat safe plastic wrap and pour a thin (1/8 to 1/4 inch) layer of the fruit mixture into it, being sure that the plastic wrap doesn’t fold over onto the fruit so it can’t dry.

Place in a 140 degree oven, or a convection oven and let dry 8 – 12 hours, until the surface is no longer wet or sticky.

You can roll the leather up in the plastic wrap for storage…if it lasts long enough.


Savory Stuffed Pork Tenderloin

Today we’ve got another easy recipe made difficult (for me) because of my inability to actually measure and write things down.  I think I’ve got it together, but you will likely want to put your own spin on this one.  Thankfully, I usually end up developing or tweaking recipes that don’t require precision, so they are pretty hard to screw up.

With a family of growing boys who are most certainly meat eaters, this has been a crowd pleaser and, while it takes a while to cook, it’s simple to put together.  I usually use a 1.5-2 pound tenderloin, but was fooled by packaging and ended up with 2 little 1-pounders, so that’s what I’m working with today.  As usual, see the notes for other ways to play with this one.

Savory Stuffed Pork Tenderloin

Ingredients

2, 1 lb pork tenderloins

3 TBSP butter

1 box dry sage or herb stuffing mix

1/2 tsp poultry seasoning, divided

2 tsp garlic salt, divided

1/4 cup chicken broth

1 TBSP olive oil

salt and pepper to taste

Directions

Preheat oven to 350 degrees

Slice your tenderloin(s) lengthwise, but do not cut all the way through.  Spread the halves open and cover with plastic wrap.  Use a meat mallet to flatten until you have an even thickness of about 1/2 inch and all the days frustrations have dissipated.  Brush the tenderloin(s) with about half of the olive oil and sprinkle with half of the garlic salt and poultry seasoning, rubbing into the meat.  20160303_162231-1.jpg

Melt the butter, then add the stuffing mix, broth and salt and pepper to taste.   Spread the stuffing mix over the flattened tenderloins(s) to within about 1/2 inch of the edges.

Starting at the shortest end, roll the tenderloin(s), tucking in 20160303_164631-1the sides and secure in 3 places with white kitchen string (I remember the string about 20% of the time, so it’s okay if you don’t have any.  Just handle with care).

Transfer to a baking dish large enough to prevent the meat from touching, if you are making 2, or an appropriately sized dish for 1.  Brush the outside of the rolled tenderloin(s) with the remaining olive oil and rub with the remaining garlic salt and poultry seasoning.

Bake, uncovered for 45 minutes.  Cover loosely with foil and return to oven for 15-20 minutes, or until a meat thermometer reads 160 degrees F.

Remove from oven and allow to stand (tented with the foil) for about 15 minutes before slicing for the best flavor and to avoid searing off all of your taste buds.

Notes

As you’ve likely figured out by now, my super power seems to be flying by the seat of my pants.  This recipe is easy to play with.  Try Tony’s, a little extra salt, sage, poultry seasoning and garlic.  You can also add raisins and substitute apple juice for the chicken broth if you prefer a sweet pork.  Like I said, it’s almost impossible to screw this one up.


Shiny! Balsamic Glazed Steak Salad

Chuck helps
Oh, please drop something, Mom.  Please.

Yesterday was a good day for a salad.  Having previously discovered homemade potato chips, and then eating them all, I was due for some raw greens.  Luckily, my gang loves a good salad, so here’s an easy one for you.  The glaze turns already delicious steak into something magical.  Use any salad ingredients you like and have fun.

I also recommend having a good kitchen helper.  Mine just tidies up the floor for me, but every little bit helps.

Oh, and 5 points if you got the Firefly reference in the title of today’s post.

Balsamic Glazed Steak Salad

Ingredients
serves 4

2-3 steaks, any cut you like, but thicker is better

4-5 cups chopped greens: iceberg or romaine lettuce, baby spinach, etc.

3 tomatoes, wedged

2 avocados, wedged

1 cucumber, sliced

1 celery stalk, diced

1 carrot, shredded

broccoli, chick peas, shredded parmesan cheese, etc.

for the glaze

1/2 cup cold water

1 TBSP cornstarch

1/2 cup brown sugar

1/4 cup balsamic vinegar

2 TBSP soy sauce

Directions

A few hours before your meal, lightly salt and pepper the steaks, drizzling with 1 TBSP Worcestershire sauce, if desired.  Return to refrigerator, then remove to counter to rest 30 minutes before cooking.

Place the steaks on a grill on high heat about 3-4 minutes per side, depending on thickness of cut.  Remove from grill and keep warm.

Add the cold water and cornstarch to a small saucepan, combining until the cornstarch dissolves.  Add the remaining glaze ingredients and bring to a boil, stirring constantly.  Reduce heat and simmer until thick, about 3 minutes.  Remove from heat.

Cut the steaks into strips and return to grill.  Brush with the glaze until a nice crust begins to form, turning frequently, taking care not to overcook.  About 4 minutes.  Remove from grill, tent with foil and rest for 5 minutes.

Place all salad ingredients in bowls and top with dressing of choice.  We recommend Balsamic Vinegar or Toasted Asian Sesame Dressing.  Enjoy.