Aren’t You a Little Tall for a Cat Tower?

Let me just start out by saying that I am not in any way, shape or form affiliated with Lucas Arts or Disney. They are not behind this and this is simply my art (ish?) solely to pay homage to a story I’ve come to treasure.

Anyway, almost 2 years ago (sad, I know) I started a journey that would test the limits of my patience, my building skills and my marriage. The conversation started a little like this:

Me- “I should totally build a cat house for Bella and Izzy to hang out in. I’m going to try to make it resemble Luke Skywalker’s house. You know? I’ll just put it on a little pedestal.”

Jamie- “How little? Because we don’t need, or have room for anymore furniture. They already love the 94 inch tall one you built them…and the separate litter box cabinet.”

Me (a little irritated)- “Not very big. Don’t worry, I think I’ll sell it anyway.”

Here’s what happened…

I did make a pretty cute little replica of the house and even built a platform for it to sit in. Getting the smooth texture proved to be a giant pain in the rear, so just this little piece took far longer than I’m willing to admit.

I wanted to mimic the underground construction of the Skywalker moisture farm (just my putting that into writing leaves no doubt as to the depths of my nerdiness, does it?), but make it easy to lift out for cleaning.

I thought about calling it “Catooine,” the wind-swept, desert planet and lovely hideaway for the feline who’s had enough of your human nonsense.

Side Bar- I loved the cat tower that I built for my girls a few years ago and wanted to incorporate some of the conveniences it offered. I also have had several years to figure out what it’s lacking.

Here’s ours again and while my girls never complained, spending hours sleeping up there, I have always regretted not adding a litter box cabinet underneath.

I figured anyone else who has dogs would enjoy being able to feed the cats out of the reach of the canine menace, so I decided to make this one more practical by including a counter top. Since it was a nod to Star Wars (NOT affiliated in any way), I went crazy with shapes. As a result of this, I have been recently (and oft) overheard telling people that, “If I ever build anything that is not a square or rectangle, please slap me. Hard.”

Of course if you’re going to have a 2 tiers, you need an easy way for your cat to reach the top. Rather than add steps, I decided to use the second tier as a nod to The Empire Strikes Back and started building what I hoped would resemble icy paths and an icy cliff. Again, waaaaaayyyy too much time was spent shaping, sanding, tiling, texturing, etc., but I used broken tiles and white grout for the floor and was pretty happy with the results.

20180223_100146

I was liking my results, but I remembered regretting not having incorporated a litter box cabinet into mine (rather than building a separate piece), so the bottom was turned into a cabinet.

I should point out that once I deviated from plan A (just the house), most of this was already cooking in my noggin. I just waited to do most of the finish work until after the rough idea was put together.

Well, you need access to the litter box cabinet that dogs and kids can’t access, so a secret entrance, disguised as an ice cave befitting a Wampum, was in order. As were ice sickles and scratching posts, icy glitter along grout lines and a strong, epoxy-type protectant.

And, heeeeyyyy…if tier was is a nod to A New Hope, and tier two was a nod to Empire, then tier three needed to recognize Return of the Jedi!

This may have been the first time that Jamie really started questioning my sanity and I can’t really blame him. I spent A LOT of time on this and I love him for putting up with it. I began to see this more as an art piece and less as a build, taking time to really enjoy the creative process (mostly).

I carpeted the outside for scratching, added “Endor” greenery and also added a tree trunk step to make it easier for older cats to climb. Sadly, a battle must took place during construction and the resulting blaster marks remain.

Tragically, this was around the time that we lost the amazing Carrie Fisher, so I decided to add a little tribute to the woman who reminded us all that even princesses could kick butt…on any planet…and look great doing it.

This is where the Ewok village was born and I can’t bring myself to add up all the hours I spent working in this thing…although, I could shut myself in there and hide sometimes, which was lovely. I loved doing some of the detail work, but the hanging net was my boys’ favorite. FYI- there are NO droids or Wookies in there.

The inside walls were covered in carpeting, with felt accents, and the floor was covered in outdoor carpet for easy cleaning and sanitizing. I put a screen on the back to prevent moisture build up and a magnetic closure door on the front. There is room for a litter box and to store food and extra litter.

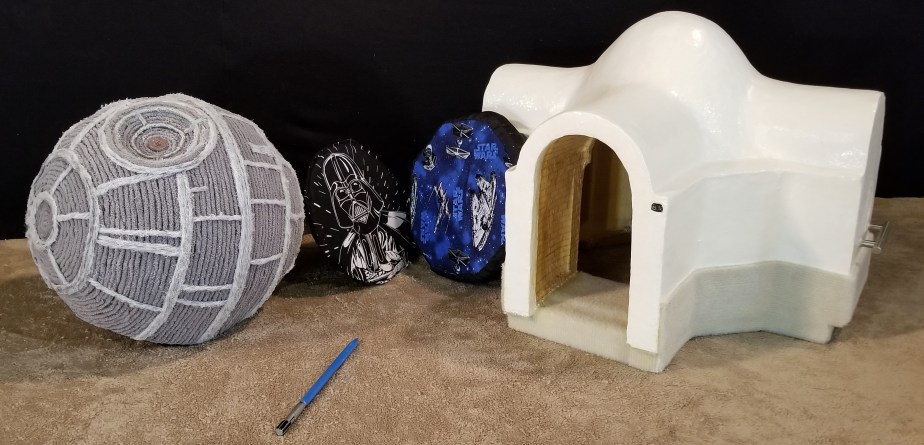
I was feeling pretty happy and thinking I could be almost finished, but then my 11 year old told me I couldn’t make this thing without a Death Star. Ugh! He was right.

Thus began another grueling period of forming and smoothing, but after forever, I had my hollowed out canvas.

Figuring what to do on the outside of the space station presented another opportunity for me to sit back for days, staring at the orb I’d grown to hate, plagued by the conflict raging in me…

Side Bar 2- how the “creative process” works in me:

OCD vs. Thinking Outside of the Box

  1. Need arises
  2. Idea sprouts
  3. Anywhere from minutes to days to weeks are spent formulating a plan
  4. Gather materials and begin
  5. Think of a really cool add-on or change and spend 1-3 days trying to figure out how to make it happen (this step happens repeatedly during any given project)
  6. Walk away for days or weeks to avoid being committed to a mental institution
  7. Implement crazy changes
  8. Finally finish
  9. Find original sketches and laugh heartily about the differences between it and the finished product

So, yes, this project was crazy.

Anyhoo, I thought that a yarn ball Death Star had to be the way to go and that a hand carved light saber (which looks more like a pen) would be a great way to keep the Yarn Star from spinning.

By removing the saber, you can grasp the Yarn Star penthouse and pull it up and our for easy cleaning or clearing low doorways.

And, of course, I had to make custom pillows, but you should know that I am a self-taught seamstress.

20180222_102728

So that’s how a small cat house became an all in one litter/storage cabinet, counter/feeding area, scratching posts and sleeping areas, know as The Cat Tower around these parts.

It is now listed on eBay, so wish me luck…and thanks for not calling me crazy to my face if you knew what I’ve been doing.

20180222_114826

Kitty PoV

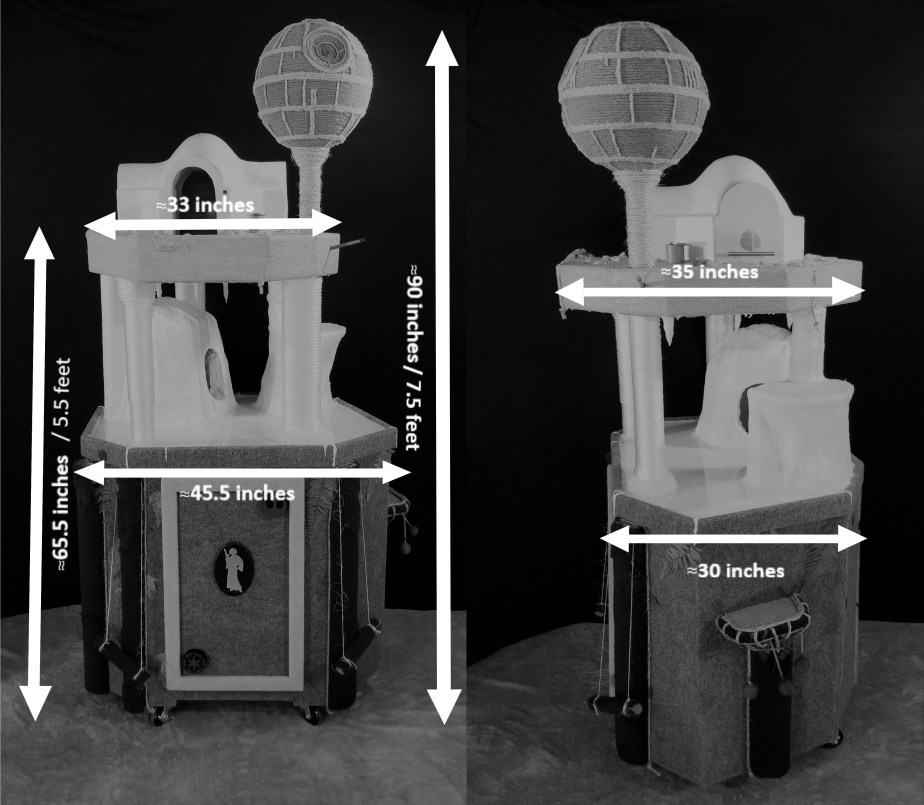
It weighs a lot, but since I’m going to go with local pick up (I may deliver) on eBay, I haven’t tried to weigh it yet. Below are rough dimensions.

0000All Dimensions

A short slide show…

UPDATE- Apparently, the base cabinet of what was almost called “Cattooine” is also a wonderful place for children to hide and eat candy.

Kitchen Countertops- Shameful to SHINY!

As most of you know, our house is on the market.  Things have been fairly slow because of first, the massive amount of layoffs from the oil industry this area relies so heavily upon, and then the devastating floods that we are still recovering from, and in some places, still experiencing.

I was so determined to make something happen to sell quickly about a week and a half before the flooding started, so I decided that it was time to update the kitchen.  For this house, with the land and the pool in this area, we are within a very reasonable price range, however, my kitchen definitely didn’t have a whole lot of “wow factor.”  In fact, I hated it.  Stained and cracked old laminate counter tops with no backsplash to break the monotony and nothing to emphasize the window looking out over the yard.  I couldn’t imagine other people walking into the house and not feeling the same way.

I ran through my options- granite (not for the $4000 I was quoted on our current income, thanks), tile (meh), Ikea laminate (a trip to Houston isn’t doable these days), butcher block (expensive and no room in the garage right now, even if I wanted to make my own).  I scoured the internet, home improvement stores and my own garage, coming up totally empty.  Finally, I decided to try something crazy.

Jamie was at work, so I was safe.  He couldn’t make fun of me or choke me (just kidding, he wouldn’t.  Just eye rolling and wondering what the heck he married because “she’s at it again”) if he wasn’t here.

I measured my counters, headed to Home Depot and purchased the following-

  • Wood glue
  • Liquid Nails
  • Lots of 1×2 strapping
  • A few 1×3 straps
  • Carbon Gray wood stain
  • 1″ nails for my brad nailer
  • Polycrilic, polyurethane or acrylic resin clear protectant
  • Plastic Wood filler
  •  A cheap, new sink on clearance for $70 (SCORE!)
  • A new bargain faucet
  • Plastic drop cloths

Step 1- Remove old sink (if replacing)

Since we’ve been in this house, people have complimented the old, cast iron kitchen sink, but they have not had to use it.  It’s a 3 bowl sink with 1 shallow (3″ deep) bowl in the middle and 2 “larger” (8″ deep) bowls on the sides.  Sure, it looked coolish, but try to wash a pizza pan or have your kids wash anything larger than a dessert plate without Niagara Falls on the counters and floor.  Totally, impractical and that sucker was coming out.

If you aren’t replacing a sink, skip to step 2.  The first step in removing a sink is to disconnect all the plumbing underneath.  Have towels and bowls ready to catch drips and start by turning off the water at the wall valves.  Then you will disconnect the water lines and the drains.  I won’t kill you with details here and YouTube is where I received my instruction.  Next, I scraped all the old caulk from around the outside of the bowl, removed old glue from under the lip of the sink and checked for removable clips underneath (there were none).


What I didn’t know was, that what the sink lacked in user friendliness, it made up for in weight.  If you every need my help disposing of a huge body, just call because that would be a cake walk compared to getting that sink out of the counter top and then the house.  Thank God we have a hand dolly because that monstrosity would have stayed in the middle of my kitchen floor until Jamie came home to help me lug it out to the garage.

Before I continued with the demo, I built a frame using 2×4 studs to hold the new sink since it was smaller than its offending predecessor.

Step 2- Remove old counter tops

Anyway, chore from hell complete, I began tearing apart the nasty, laminate counter tops.  I debated about purchasing plywood to lay underneath the design I had in mind, but the wood under the laminate looked like it was in good shape and wasn’t going anywhere with all the glue and nails the installer had used.  I kept the wood and saved money.  This was not a fun job and about halfway through, I started wondering what in the heck I had been thinking.  I heard Gob’s voice from Arrested Development in my head saying, “I’ve made a huge mistake,” several times.

20160802_195021_001.jpg
WHY AM I DOING THIS TO MYSELF!?!?!

If you need to replace the wood underneath, you can simply purchase plywood, but you may have to add 2×4’s to give you stability.  For what I did, you will want to eliminate the chance of things falling through cracks into your cabinets and have something to glue and nail to.

Step 3- Cutting and placing

I decided to go with the 1×2 strapping because it was A) $.92 a strip and, B) would give me a look close to butcher block when completed (though I was thinking, “Please, God!  Let that be true!” at this point).  I opted to cut my strips into 2′ pieces and staggered them similarly to a hardwood floor design, obviously needing to trim edge and corner pieces to fit.  I removed my stove to make it easier to work, installed the new sink and began to lay my pieces, first gluing with wood glue, then pulling them tight and nailing with pins from the brad nailer (nail gun).  I then used the 1×3 straps to trim the edges and around the sink, setting them in place with Liquid Nails and pins from the brad nailer and was done with construction.  I was so frickin happy at this point, but I was only half way there…

20160805_123206
Wood placement complete!

Step 4- Sanding, putty and more sanding

By this time, Jamie had been home for a couple of days and was leaving for work again.  His demeanor, plus the fact we were washing dishes in the bathtub and couldn’t use the kitchen, did little to convince me that he could see the end result that was in my head.  I pressed on, telling myself that my vision would be realized and he would eat ample helpings of crow…I prayed that would happen, anyway.

If you have carpal tunnel, as I do, this is another point at which you will start to question your own sanity.  Lots of stretching and ice is recommended.  I use an orbital sander and the vibrations can be rough, so be sure to take lots of breaks.

First I sanded the wood after the glue dried.  You’ll need to do this because the strapping is cheap wood.  It’s hard enough to find straight pieces not full of knots, let alone smooth ones.  I strongly recommend building a plastic cage like I did to keep the dust from invading and covering the rest of your entire house.  I also put a fan in the window to blow the dust outside and you will absolutely need a respirator of some kind and eye protection.  Simply attach strapping to the ceiling with plastic sheeting hanging down and weight the bottom of the sheets with more strapping to eliminate too much movement, like so-

Initial sanding complete, I was ready to vacuum the sawdust that remained and start to fill the gaps with putty.  Originally, I intended to only fill the large gaps, but my OCD got the best of me, so I spent a VERY, VERY long time filling ALL the gaps between the slats and the nail holes.  The plastic wood I tried this time was the perfect product for the job.  It dried quickly and went on pink, drying to a natural wood color.  I just prayed that it would stain like wood as the label claimed.  I sanded the dried putty and wood slats to a smooth finish, then prepared for stain.

Step 5- Staining

This is when I allowed myself to get a little excited, catching a glimpse of the finish line for the first time.  I started to stain, brushing it on and wiping it off in a few minutes, and my vision was becoming reality.  I wasn’t sure about the color because I had pictured a slightly lighter gray with green undertones (tying kitchen, dining and living together), and would maybe have gone with an ebony if I’d known.  The staining was finished fairly fast, but I wasn’t in love.  I took a little mahogany stain I had in the garage, lightly ran some over the top of the gray and was happy with the result.

Step 6- Backsplash

I originally thought that there was enough glass tile left from the previous owner’s work in the bathroom to complete a backsplash in the kitchen.  I was mistaken.  Working on a tight budget, I headed to Home Depot again and realized that there was no way I could justify the cost of new tile for the job.  I thought about using some red cedar I had, but it just didn’t look right.

Eventually, I decided to try ripping the 1×2 strapping in half with the table saw (a terrifying job) and at first was discouraged that I couldn’t get all of the pieces to the same width.  This was a blessing in disguise because I realized it was adding character to the overall look.  I cut these into 12″ pieces, stained them with 4 different stain colors I had in the garage and staggered them, trying a few different variations before deciding on the final layout.  I used a lot of Liquid Nails and a few pins from the brad nailer to attach them to the wall.

I’m pretty happy that I didn’t have enough tile!

Step 7- Polyurethane

I only had to wait a few hours for the stains to dry and was able to come back and apply the polyurethane to the counter tops and the backsplash.  This would take longer to dry- 2 hours to the touch, 48 hours for light use and a full week until we could roll full steam.  I opted to leave the plastic up to keep the cat and children from doing damage, but I was unable to protect it from myself.  I decided that 2 hours was a long enough wait before replacing the stove without risk of scratches.  It wasn’t.

I touched up the area around the stove, the paint on the cabinets, caulked around the sink, picked up some clearance fabric Andrew chose and whipped together curtains, then finally was able to stand back to view the finished product.  I’ll be darned if it didn’t exceed my expectations.  Jamie was shocked and really loves it.  My friend Sandy, who is also my realtor and tough to please (TOTALLY, KIDDING, SANDY!  You’re are amazing and you know it), was very happy with the results as well, even trying to get me to do her counters.  It’s still a small kitchen, but it’s a heck of a lot nicer than the old, gross laminate!  Would I do it again?  Um, I’ll get back to you on that.

20160808_19413320160808_19424520160808_194334


Screenshot_20160807-085932
Before
1005 Charles Dr, Broussard, LA 70518
After

 Oh, and I should tell you guy that this whole project was around $200!


That’s No Moon! It’s a Charging Station!

In case you haven’t noticed, even though I’ve been stuck in the recipe rut for a while (my waistline will attest to this), I am a little OCD.  Though we regulate video games and save them only for the weekend (if earned through chores and behavior), the kids have tons of online homework every night (:-/).  This means a tablet for everyone and the annoyances which come along with trying to keep them charged, in a central location and to not lose the chargers.

I also admit that I have been horrible lately about playing on my phone or Kindle in bed every night and I wanted to have a place to put them that was out of my reach.  I used to devour books nightly and lost my way for a while…Again with the first world problems.

Anyway, my need for organization drove me into the garage with a plan.  I had a 2″ X 4″ frame which I’d built for a cat tower that I’m slowly, very slowly, working on and so I decided to re-purpose it.  I took shelf boards, cut them to fit into the frame and screwed them on an angle.  I put a 1″ X 2″ lip on the bottoms of the shelf boards, with angle trim to hold the devices in place and drilled holes into the bottoms through which to feed cords.

Finally, I used industrial Velcro to adhere a power strip to the bottom and cut groves to feed cords through the back side, thereby avoiding the giant mess of cords which usually plagues me.

I’m not done painting it, but I feel like another trip to Home Depot this week would just be sad (people seem to think I work there now), so I used paint I had on hand.  Yes, it’s 2 different colors because pickins’ were slim.  Don’t judge!

I’m loving this though!  My inner Adrian Monk was looking over and smiling at it until I drifted off to sleep last night.  Hope this inspires you!

Sew You’re Tired of Working in Solitude?


Three and a half years ago, having sewn only a few buttons back on since Junior High, I decided I needed to get myself a sewing machine.  I was becoming a canner, a gardener, a plumber, a painter and such, so I decided to add seamstress to the list.  Sadly, after purchasing an inexpensive machine on Amazon, I realized that our old house was only 1000 square feet, with nowhere, I mean nowhere, to fit a machine.

The poor, abandoned Brother longingly called to me from its place of solitude and neglect in the air conditioned little pump house where I was forced to store my canning.  Its box, never opened, collected dust and when we finally moved to the bigger house, I swear it was lighter with the excited anticipation of finally being released from its prison!

Alas, this was not to be.  It was three years, almost to the day, before I took out a box cutter and unleashed the beast.  I was building a cat tower for my brother and his fiance and I couldn’t find the right pillows for the houses, so I decided to try my hand at sewing my own.  I’m telling you right now, it wasn’t pretty and there will be no pictures of those pillows.

Anyway, I sewed my own and they were functional.  I then decided to make an easy fur cape for my niece.  Ha!  Easy?  Um ,no.  I chose fleece and made it reversible which was crazy, overly ambitious for a first attempt at a garment (Luckily, she is five and easy to please).  I sewed gift bags and stockings for the holidays, mended some clothes and the ball was rolling.

I soon realized that with my new hobby came the loneliness of confinement to the dining room, as that was the only available table.  I priced sewing tables and almost fainted at the prices I found.  A machine which cost less than $200 most certainly did not belong on a $1000 table, so I figured I would build my own.  As I often do, I was flying by the seat of my pants, a plan in mind and even a sketch with measurements, but the seat of my pants nonetheless.  I wanted somewhere to keep the machine without constantly having to move it out of the way and would allow me to still be in the same room as the rest of my family.  Here’s what I came up with:

20160224_091259

I put this little table on casters so I could move it around and added three drop leaves for plenty of work room.  Currently, it resides in our living room, behind the couch which allows my ADHD to run free during family movie night, for example.

It’s not quite finished yet (it needs another sanding and coat of paint), but it is very functional and that was the goal.

I’ll show you the specifics and give you some ideas if you are thinking of building your own.  Sadly, my original sketches and measurements are all gone, but I can answer questions, should you have any.

The first thing I did was to make sure I had strong boards and framing to work with.  I just grabbed a couple laminated pine boards from Home Depot and already had the 2×4’s, 2×2’s, 1×2’s, hinges (save the long ones) and screws at the house from previous adventures, so shopping was relatively painless.

I built the frame of the table using 2×4’s and 1×2’s, using salvaged slats from old projects for the base.  I had built the hideous box you see underneath in a successful, if not pretty effort to organize my sewing paraphernalia a few weeks prior, but it weighed a ton so the base had to be very strong.
20160224_090129

Before attaching the table top, I traced the outline of the machine, making sure to leave room for the cords and to access the power switch.  I then cut out the area with a jigsaw, making sure the machine would fit before attaching to the table.  Underneath the large cutout, I used a solid board and drilled holes through which the cords for power and the foot pedal could run.

My original plan was to have one drop leaf on the left side of the table where I could place the materials I fed through the machine.  Having the small zoo that we do, it’s vital to keep things off of the floor since, no matter that I vacuum daily, I could knit sweaters with the cat and dog hair collected.20160224_085906-1

I attached the leaf with a long hinge and the leg with a smaller hinge.  I knew I had to get creative here because this leg was too long to simply fold up, so I had to cut the leg in half and hinge that as well.  This particular part of the project almost drove me to drink, which is why I always recommend that, when you reach this point, you walk away.  Take a hot bath, eat something, scream into a pillow, whatever it takes to keep your head from exploding.

Anyway, this is what I ended up doing:

Again, not pretty, but functional.

Not sufficiently aggravated by how long it took to come up with this part of the table, I decided to add an even bigger leaf which I could use for cutting, etc.  This one would need two legs, but thankfully was big enough for the legs to be hinged only to the table and did not to require my going full-MacGyver.

If you know me, then you know I wouldn’t last five hours in the desert.  Not because I’m not a total bad a$$ survivalist, but because I cannot go half an hour with a drink of water.  This prompted the need for a small drop leaf on the right side of the table where I could keep my water, my phone and other items.

Because I was trying to be frugal and the leaf didn’t need to be very large, I used the small board that I had left from cutting the rest of the table tops.  Knowing myself all too well, I also knew this leaf had to be lower than the others, keeping my glass and other items out of the reach of my unparalleled ability to spill and break things (lost my phone insurance twice for too many claims after shattering screens by briefly removing the cases to clean the screen.  Who knew two claims a year was the max?  And don’t even get my husband started on all the liquid I’ve spilled over the last fifteen years).

There was no way to get a leg attached to this leaf since it would have needed to be very short and I wasn’t going through a repeat of the hinge battle which had raged within me on the left drop leaf.  After much debate, trial and error and more than a little cursing, I ended up with the following:

And that’s it.  I strongly recommend giving this a shot if you are in need.  The whole project cost me less than $120 and took little time to complete.  It’s been nice to feel like I’m still a part of things with the family, even when I’m on the machine for hours, and I love the flexibility of this thing.

Here it is again in it’s full glory:

20160224_090439-1


Simple Shelving Saves your Sanity

I may have established the fact that I am rather OCD in certain areas.  The older we get, the more crap we accumulate, the more we clean, the more your family comes in behind you and messes it up.  I am learning that in order to get everything put back in its place without having to daily go full-on Mommie Dearest, I had to provide items with their very own place.  And so my life as the female Bob Villa began.

Today we’re going to talk about this:

Dishes

Yes, the dreaded moment you realize everyone and their brother has at least three water glasses going at once…or didn’t take care of their dirty dishes (I can’t help you with the latter, because I’m still working on that here).  I was starting to go a little insane, so I decided to make a place for these and other small items.  There isn’t much wall space in my kitchen at all, so I went pretty small, but I knew I needed shelves.  I can’t tell you how much this has helped!  The dishwasher isn’t full of glasses everyday and I haven’t heard an, “Hey!  That’s my cup!” argument in ages.

Finished Pr
ID badges, cups and chore lists have a home!

These took less than an hour to build and paint and are the most practical shelves I’ve put into the house.  They are easy and I will walk you through all the steps you need.  I am going to speak to the beginners among us, so skip over the detailed parts if you’re advanced.  These will be 5.5 X 7.5 shelves, but you can adjust size slightly, if needed.  *Please see note below for questions.

For this project you will need the following:

  • Drill
  • Level
  • Stud finder (if you have one)
  • Tape measure and speed square, if available
  • 8 to 12, 1 1/2-2 inch screws
  • .5-1 inch screws, or nail gun & air compressor with 1-1 1/2 inch nails
  • Wall anchors (pictured below)
  • PENCIL!!! (don’t put it down)
  • 2 six foot 1×2’s for supports
  • Board for shelves at least 6 inches wide by 32 inches long
  • Miter saw or nice people at Home Depot
  • Wood glue

tool set 2


Simple tools for this job.

flip

flip tip


The flip drive pictured above is a great tool to have if you don’t want to switch tools or bits during the job, but a drill bit and a screw bit will work as well.

Step 1

Select the area on a wall where you would like the shelves.  Take your stud finder and locate the studs in the wall.  Use your level as a ruler and draw a level line where you would like your center shelf to go.  Make sure that at least one screw along the line will go directly into a stud.  You may have to pick a new spot if you can’t find a stud right where you want it.  Just make sure the area can accommodate a 7.5 inch shelf.

Line

Stud finder
Stud finder in action

NO STUD FINDER?  If you don’t have a stud finder, simply take your level and draw a line with your pencil, using your level as a ruler.

Take a thin nail and a hammer and tap holes through the wall along your line until you meet resistance, indicating a stud.  Mark the wall with your pencil (you put it down, didn’t you?), a few inches above the stud, lightly enough to be easily erased.  Don’t worry about the small holes in the wall as your shelf should cover them.

*

 Step 2

This is where you will need your miter saw, or a nice person at the hardware store to cut your wood.

miter
Miter Saw

Place your 1×2 on the saw and cut the 2 inch length at a 45 degree angle.  Measure 5 1/2 inches from the tip of your 45 and cut the other side at a 45 in the opposite direction.  Cut another 1×2 the same way, same length.

Perfect


You can check your work holding the pieces back to back like this:

Mea

Cut two more pieces of 1×2 the same way, but make them 7 1/2 inches long from tip to tip as shown above.  When you have all four pieces cut, you should be looking at a perfect picture frame.

45s

box
Not perfect yet.


Step 3

Run a small line of wood glue down the middle of the your 45’s and join the pieces together into that picture frame.  If you have a nail gun, pin your frame together, using a speed square (if you have one) to make sure your angles are correct, 90 degrees.

Square.jpg
Speed Square


If you don’t have a nail gun or pinner, you can take your drill and drill holes, using the smaller screws to put your frame together.  Be sure to countersink your screws if you want to hide them with paint later, as shown in the photos below.

countersunk             end 45s

If you do not have a miter saw, or don’t want to make 45 degree cuts, you can join the ends of your wood like the image on the right.Butted

Just be sure to adjust your measurements on your 1×2 frame to 2, 7.5 inch pieces and 2, 4 inch pieces.

Step 4

When your frame is put together and square, place it over the board you want to use for your shelf.  Most people measure, but OCD woman likes to trace for an exact fit.  If you want the frame to sit under the shelf (see left below), trace the outside of the frame onto your board.  If you want to hide your shelf inside the frame (see center below), trace the inside of your frame, using the straight ends of the board to help, if possible.  Like so:

Cut your board and make sure it fits within your frame, or squarely on top, depending on your method.  I wanted to hide my board (I was using scrap wood) so I used wood glue on the board edges and pinned it inside the frame.  You can also use thin screws and your drill.

Fit
Inside the frame and pinned, after painting and installation

Step 5

Your shelves are now built and you can paint them at this time, if you are using spray paint, otherwise, time to install.

Decide whether you want the frame on the top or bottom of the shelf.  I did the Mom and Dad shelves with the frames down for more room and the kids’ shelves with the frames up to prevent spills.

Hold the 7.5 inch side of your shelf on the level line you drew earlier, making sure that the line on your wall and the line of the shelf match perfectly.  Take your drill and drill holes for the 2 inch screws that will hold the shelves, being sure to drill through the wall side of your frame, into your stud and wall and countersink your holes.

I was lucky enough to have two studs close together, but I had to angle my screws (below)

CS.jpg
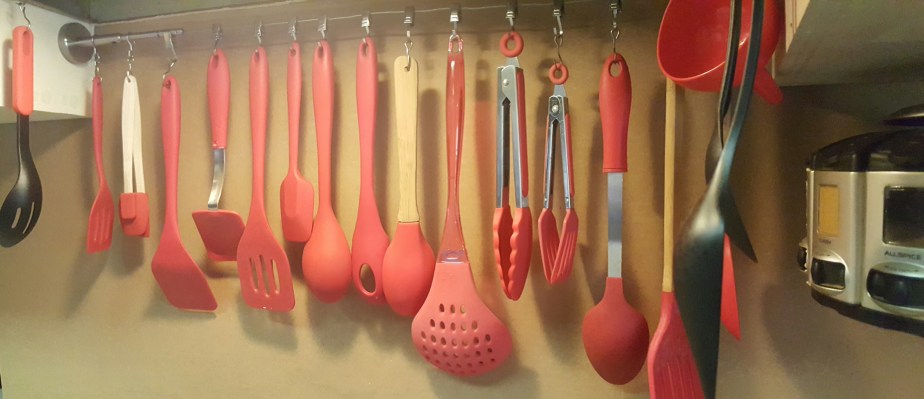
They aren’t pretty, but c’est la vie.  Anyway, if you don’t have another stud, you’ll need to use anchors.

These are available everywhere and give added stability to a screw going into straight drywall.  You’ll need to drill the hole larger (package will indicate hole size needed) and then you will screw in the same way you will to your stud.  DO NOT use an anchor in a stud, as it is not necessary.

asst anchors.jpg
Assorted anchors
Anchor.jpg
Anchor


Now you can screw your shelf into the wall, being careful to keep it level, double checking with your level.  Once your screws are in tight, but not too tight, spackle to hide them and any other area which needs it; let dry and paint.  Voila!
Finished Pr

***********************************************************************

*NOTE: Building these is vastly easier than describing how to do it, so if you have any questions, please ask them in the comments.  Also, my computer seems to have lost its mind today, so if this looks like it was put together by my ten-year-old, I’m sorry.


Organizing is my game

Solving the Utensil Dilemma

We all know that half of the battle in the kitchen, or anywhere in life really, is staying organized.  I’ve been a bit OCD about this for the last few years, which you are bound to pick up on if you stick with me on this journey.  With as much kitchen gadgetry as I have, it’s vital to have a place for everything.  My poor husband and boys have had to deal with many a kitchen (and whole-house) rearranging, but I am a slave to efficiency in my old age (tee-hee), so they just have to deal.

Since I have made it my personal mission to learn how to make many things myself the last few years, I usually have at least one recipe going from scratch at any given time.  This, as you may guess, uses up a lot of utensils, measuring cups and spoons and since I hate washing dishes, I need a lot of back ups.  Also, this house is due for a major kitchen overhaul, starting with drawers that are, I kid you not, less than three inches deep.  Not even deep enough to hold a ladle.  Thankfully, on one of my pilgrimages to IKEA (it’s about 4 hours away and is my happy place), I was struck with inspiration.

I decided to get all of my most oft used tools and organized them in an easy to reach fashion. so first, I purchased a curtain hanging system, and though its sounds odd, it’s perfect for utensils.

Utencils

The kit comes with the anchors, wire and clips and is incredibly easy to install with just a tape measure and a drill.  I hung it above and to the rear of my stove where I can easily grab what I need and this makes things much more simple when my boys unload the dishwasher.  No more, “MOM!  Where does this go?” and if that does happen, my reply can be, “Did you forget how to read, my gifted child?”  Yes, I’m afraid my sarcasm spills over into my parenting.  It was inevitable.

Here’s the link to the product:

http://www.ikea.com/us/en/catalog/products/60075295/

I feel like I have to add that I normally don’t have cardboard blocking the area between my kitchen and living room, but the back light from the sun through the windows was too bright not to block out for a picture.

***********************************************************************

Measuring Cups and Spoons Set Free From Messy Drawer Bondage!

My second idea is even easier, born out of desperation because I really needed somewhere for my measuring cups and spoons, kitchen scissors and other miscellaneous tools.  With the utensil holder working nicely, I started looking for other places to hang the essentials.

Under my low-hung cabinets where things like coffee pots and Kitchenaid mixers don’t fit was a perfect place to start.  I simply took a 1″ X 2″ piece of strapping and cut it to the length I needed to fit under my cabinets, spraying it with red Rustoleum 2X paint.  Yeah, I’m on a red kick lately.

Boards
The 1×2 is on your right and the 2×4 on the left for size comparison.

When the paint was dry, I measured and put a mark every 2 inches, then drilled a small hole, twisting in one of these little hooks found at most hardware, grocery and even dollar stores:

Hooks
Any size you need will work.

I then added labels (Did I mention that I am a wee bit OCD?) so that I could keep them in order and the non-OCD trio with which I live could empty the dishwasher without going insane.

Measuring close up

The end result is awesomely efficient!  My kids can put things in their place (the husband hasn’t quite figured it out yet) and I know exactly where to grab what I need without digging in a messy drawer.  This also helps the boys when I’m teaching them to cook things and is a good excuse to play with the panoramic camera on my phone.

Measuring

So there you have it for today.  Easy steps that make a huge difference.