If you are looking for a healthy recipe for seafood lasagna, this is not it. If you are looking for a rich, decadent once a year treat for your family and friends, read on. Even if Captain America isn’t your server, seafood lasagna is a creamy, taste bud loving, tummy pleasing, comfort food that you will love.
This is a relatively easy recipe and it is always a huge hit. Like many foods, it’s almost better the second day and freezes really well. I can usually squeeze 2 lasagna pans out of this and will freeze one for later. You can’t really use too much Tony’s or creole seasoning because the cheese and noodles dissipate the flavor, but don’t get too crazy.
Seafood Lasagna
Ingredients
3 large onions, diced
1 bell pepper, diced
3, yes, 3, sticks of butter (1 & 1/2 cup)
1 lb shrimp (chopped, if desired)
1 lb crab meat (I use the fake stuff and chop it up)
1/3 cup flour
2 cups mozzarella, shredded
2 cups cheddar, shredded
1 cup parmesan, shredded
1 box lasagna noodles, cooked, or 1.5 boxes ready to use lasagna
Salt, pepper, garlic, Tony’s to taste (if you want specifics;1 tsp salt, 1/2 tsp black pepper, 1 tsp garlic powder, 2-4 TBSP Tony’s)
Directions
In a large stock or black pot, saute onions and bell pepper in 1 stick of butter for 10-15 minutes, stirring often. Add shrimp and crab and cook 15-20, minutes, stirring often. Season with salt, pepper, garlic and Tony’s.
In another pan melt 2 sticks of butter and 1/3 cup of flour, whisking until smooth. Add the milk and cook until thick. Add to the seafood and veggie mix, stirring until blended and taste to season.
Layer in lasagna pans, starting with seafood mix, cheese then noodles. Bake 45 min to an hour, (longer with ready to use noodles) at 350 degrees.
May the 4th be with you, everyone! Yes, I could not have timed this better. Last night I made artichokes and I think I scared my children by consuming them with a speed and pleasure they have never before seen. I couldn’t help it. I adore those weird looking things! My mother used to make them on special occasions when we were growing up and I remember feeling the same level of excitement when they hit the plate in front of me. I have my mother to thank for most of my exposure to lesser known foods and I hope to expose my kids to the same wonders.
I only made 2 artichokes last night because Jamie wasn’t home and my boys don’t inhale them like I do, but the recipe will make 4.
Eating an artichoke can be daunting for a lot of people, so I’ll try to give an easy tutorial for those new to their wonders after the recipe.
Boiled Artichokes
Ingredients
4-5 quarts water
4 artichokes
1/4 cup salt
1/8 cup lemon juice
Dip Ingredients
1/3 cup mayo or Miracle Whip
1 TBSP lemon juice (you may need to add a little more if using mayo)
Salt, pepper, Tony’s to taste
Directions
Fill a 6-8 quart sauce pan with enough water to cover the artichokes, and then add the 1/4 cup salt and 1/8 cup lemon juice. Bring to a boil.
Cut the top 1/3 off of the artichokes, trim the stems so they will sit flat on a plate and snip the sharp points off of the outer leaves (if necessary).
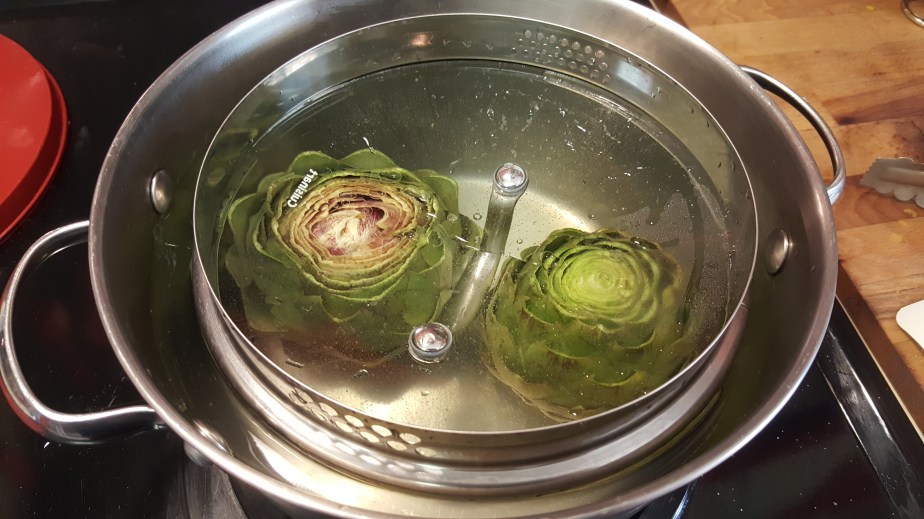
Using tongs or a slotted spoon, place the artichokes, leaves up, into the boiling water. Use a heavy pot lid or similar to keep the artichokes submerged (I learned this trick from Emeril and I love him for it!), like so:
Reduce heat to a gentle boil and cook for about 30 minutes.
In a small bowl, combine the dip ingredients, adding salt, pepper and a dash of Tony’s (if desired) to taste, stirring until creamy. Set aside.
Using tongs or a slotted spoon, remove the cooked artichokes and place upside down to drain, cooling until not to hot to handle.
Serve with dip.
For the artichoke newbies:
Remove the leaves by pulling gently downward and away.
Dip the thicker end of the leaf
Gross? Maybe. But this is what it should look like when you’ve eaten it.
(the side which pulls away from the body of the artichoke) into the sauce and then scrape the thicker, lower inside of the leaf with your teeth to remove the “meat.”
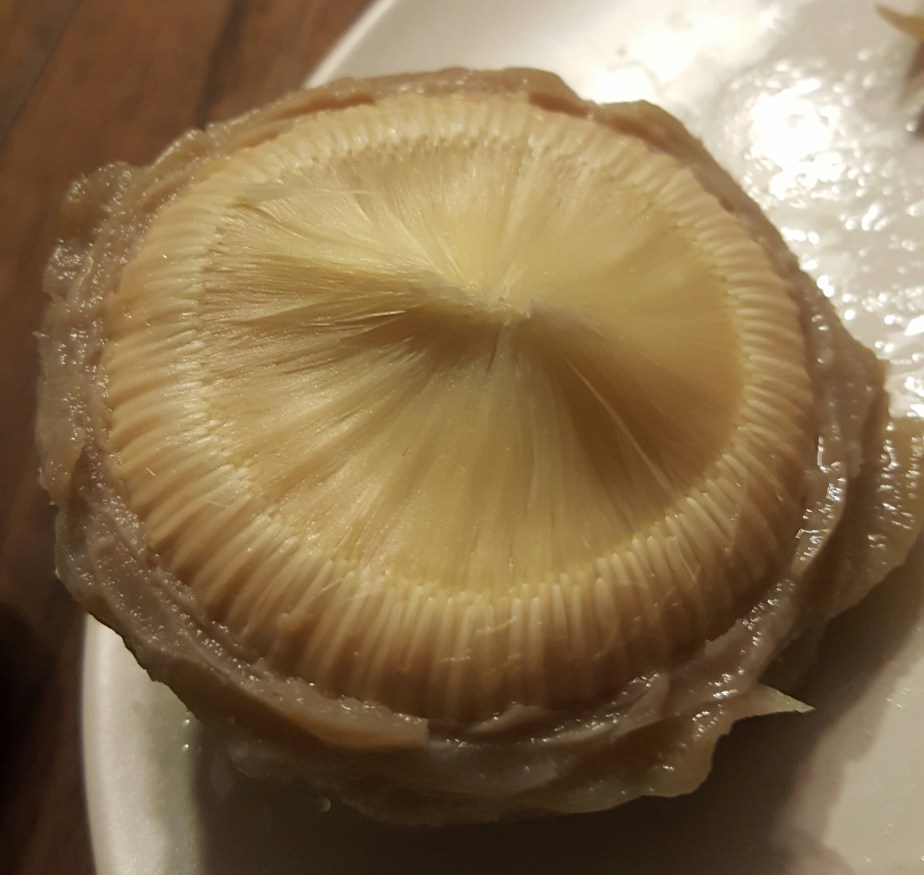
When you get close to the center, the leaves get smaller and you can actually eat the meaty end without scraping.
When you reach the fuzzy looking part, you are at the heart. Simply use a spoon or knife to remove the fuzz and enjoy the heart.
The fuzz hiding the good stuff is easy to scrape away
I apologize for being silent so long. Sadly, we live in a mysterious suburban black hole where our only choice for an internet provider is Suddenlink. I am now entering day 5 without service and realizing how over-dependent I am on the world wide web. I have already used 75% of my data on my phone plan just doing homework and writing the blog Friday. Ugh, first world problems. We truly are blessed…
Anyway, it’s time for me to admit something…I love tomatoes and basil. I don’t mean that I could eat it a lot or that I’m very fond of them. I mean I could live off of the combination for all eternity. I could sleep on a bed of them. I could bathe in…I believe I’ve made my point.
When we moved back to Louisiana and I realized that an heirloom tomato plant or two in buckets could not withstand the various plagues of insects we deal with, I went to ground…so to speak. I am cloning plants like crazy and so excited for the Mortgage Lifter and Black Cherries we have coming in! Last year we had one so big that I was able to make 5 tomato sandwiches out of it. 5!
Anyway, my take on Caprese varies. This time I added the prosciutto for a little extra protein and so that we could make a meal out of it. Luckily, my whole crew feels the same as I do about tomatoes, so it was a hit. It’s such an easy meal or side and you can use virtually any dressing you like; oil and vinegar, balsamic, Italian, etc. The secret is fresh mozzarella…and of course fresh tomatoes and basil. Just play with it, but here’s what I did.
Caprese Salad
Ingredients
4 large tomatoes, sliced
fresh basil leaves, enough for every tomato
1 roll fresh mozzarella, sliced and enough for each tomato
1 pack prosciutto
Balsamic Vinaigrette salad dressing
Salt and pepper, if desired, to taste
Directions
Layer in order: tomato, prosciutto, cheese and basil then place on a platter.
Cover all with dressing and salt and pepper, if desired, and marinate for at least 30 minutes.
Okay, you try to find something that rhymes with Marsala and makes sense. I meant my kids and husband, by the way.
Anyway, it was late Wednesday and I realized I had nothing, absolute bupkis, on the menu. I ran to the freezer and found some chicken breasts I’d used the food sealer to separate and tossed the package into the pool. Sadly, it’s already warm enough here to defrost this way in about 20 minutes without having to use the microwave. Or maybe I’m lucky, but I can’t be sure. I miss the seasons and I miss having a reason to wear sweats and fleece, but I like swimming and gardening already. Oops, sorry. Took you down the rabbit hole again.
Sooo, I decided on Chicken Marsala. This is always a hit over here, but I don’t know why. Let me explain: my house is divided. Andrew and I adore mushrooms, but sadly, Jamie has always professed to hate them. Apparently, they remind him of chopped up snakes and, no, he’s never eaten a chopped up snake. Daniel has gone back and forth from mushroom lover to mushroom hater so often it makes my head spin. Currently, he is a hater, but managed to eat thirds anyway. Point being, don’t be afraid to try this even amidst a sea of mushroom loathers. You can pick them out, if you must.
This is a super easy meal which you can sell as gourmet and a ton of work without anyone questioning you. You can use fresh mushrooms, but I learned not to keep them around when there are only two of us committed to eating them. The rosemary is optional, but so good. Use fresh or dried and enjoy!
Chicken Marsala
Ingredients
4 chicken breasts
flour, for dredging
1/2-1 tsp garlic salt
2-4 TBSP butter or olive oil (I usually start with butter and use the oil to prevent burning)
1-2 cans sliced mushrooms, drained
1 cup Marsala cooking wine
1/4 cup water
2 TBSP chopped parsley
1/4-1/2 tsp rosemary, optional
salt and black pepper to taste
cooked egg noodles to serve with chicken and sauce
Directions
Pound the chicken breasts flat with a meat mallet between plastic wrap and then sprinkle with the garlic salt. Coat with flour and cook over medium high heat about 4 minutes per side in 2 TBSP of the melted butter or olive oil. Add more butter or oil as needed to prevent sticking or burning. Remove to platter and keep warm.
Add butter or olive oil as needed and sauté the mushrooms for about 5 minutes.
Add the wine, water, parsley and rosemary. Stir until all the bits stuck to the bottom are incorporated into the liquid then add salt, pepper and extra garlic as needed.
Serve over cooked egg noodles, spooning the mushroom sauce over everything. Voila! Awesome sauce, indeed.
It’s big time testing week here in Louisiana. A time for parents, children and teachers alike to stress out over whether or not we all measure up. One of the things drilled into our head is that we need to make sure our kids get a healthy breakfast, so I’m pulling out all the stops. Okay, not really, but we’ve shifted from Pop Tarts and cereal to pancakes and these babies, which are the breakfast of choice around here. I let Andrew make his own today and I should have taken a picture. I could have fed a small village with his, but I’ll be darned if he didn’t eat the whole thing.
This is such a simple crowd pleaser and people never believe it’s as easy and fast as I tell them. Here’s the proof, folks!
You can add chopped onion and bell pepper, salsa, extra chili powder and cumin or anything you desire. Serve and dress them as you would a regular burrito, then sit back and accept applause.
Who doesn’t love a good burger off of the grill? Okay, not everyone. Sometimes they are fabulous and sometimes just plain flat and flavorless. These burgers do not have that problem. As I get older, I have no interest in boring food and these are a party on your taste buds without actually burning them off. They are definitely a crowd pleaser and even professed jalapeño haters, like my youngest, will devour these with great enthusiasm…unless they are my friend Allison, who will nibble on it for an hour. I wish I could eat slowly, but I feel like the mother from a Christmas Story; if I don’t inhale my food, I’ll never see a hot meal.
Where was I? Oh, yeah. You can serve these on Texas Toast or gourmet buns, but we were quite pleased with our plain Jane buns. The avocado is the perfect compliment and the prep is painless. Gourmet meal with fast food prep time.
Jalapeño Burgers
Ingredients
2 jalapeños, seeded and finely chopped
1 TBSP + 1 tsp chili powder
2 tsp ground cumin
1 tsp salt (or to taste)
1/4 tsp black pepper
1 & 1/2 pounds ground beef
1 large onion, sliced
1 sweet red pepper, sliced
1 avocado, sliced
garlic herb cheese spread
Burger buns or Texas Toast
Butter or olive oil
Directions
Mix the jalapeños, chili powder, cumin, salt, pepper and ground beef and shape into patties. Cook on the grill or in the broiler to desire completion.
Sauté onions and pepper in butter or olive oil until tender. Sprinkle with a little salt and pepper if desired.
Top each burger with garlic herb cheese spread, sautéed onion and pepper and avocado and serve on a bun.
Take that first bite, close your eyes and sigh a happy sigh.
At least that’s what Daniel called them when he was 5 and this was his favorite meal. Typically, I only smother when the weather is cold, because a rice and gravy can be pretty filling, but last night was stormy. The damp chill made it a perfect night for this Cajun comfort food. I’m a little nervous about backlash from my Louisiana family, and my grandmother might be looking down her nose at me from Heaven, because, once again, I do things a little differently. It’s good, I promise! And I’m totally kidding about my family coming after me.
These were actually inspired by Emeril’s smothered chops recipe, so they can’t be all bad, right? Normally, I use boneless chops and cut them into bite sized pieces after cooking so we can make this a bowl meal, but I only had bone-in chops this time. They still turned out awesome.
The best part of this recipe is that it is virtually impossible to screw up! There have been times I’ve had to make it without celery, potatoes, green pepper or broth (used bullion instead) and it always turns out yummy! Last night was no exception. I was working like crazy, trying to finish before the power went out again during the storms, helping with homework and answering phone calls. I realized that I had accidentally tripled the amount of flour, but saved it by adding extra olive oil. I caught myself pouring in beef broth, but only after 2/3 of the can was already in the pot. I doubled seasoned with Tony’s and Zatarain’s Blackened Seasoning, but this was a fantastically happy accident. Somehow it ended up being one of the best ones I’ve made in a while. Who knew?
You gotta’ love it when your kids say, “Hmm! This is good!” like they are shocked you have it in you.
Smothered Pork Chops
Ingredients
6-8 thin cut pork chops
3 TBSP, or lots and lots of Emeril’s Essence Creole Seasoning (is it strange that the name of this kind of creeps me out), Tony Chachere’s or other Creole seasoning,
1/2 cup olive oil
heaping 1/4 cup flour (in other words, not a level cup, 1-2 TBSP over)
1-2 large onions, chopped
1 celery stalk, chopped
1/2 – 1 green pepper, chopped
salt and black pepper to taste, or 1/2 tsp of each
1 TBSP minced garlic, or garlic powder
3-4 bay leaves
2 – 14.5 oz cans chicken broth
1 & 1/2 – 2 cups water
1 pound smoked sausage, cut into bite sized pieces
2 cups potatoes, peeled and cut into bite sized pieces
cooked rice for serving
Directions
Season both sides of all the chops and rub them to get that flavor in there.
Heat your olive oil in a black pot or similar heavy duty pot on high heat and brown the chops for about 3 minutes per side. Remove to a plate and keep warm.
Reduce heat to medium and add the flour, stirring constantly until you have a roux the color of coffee with a teaspoon of cream in it, about 5 minutes.
Add onions, celery, green pepper, salt and black pepper and cook in the roux, stirring constantly for 4-6 minutes, until veggies are soft.
Add the garlic, bay leaves, broth and water and bring to a boil. I add an extra 2-3 TBSP of Tony’s or other Creole seasoning here, but season to your taste.
Put the chops back in and reduce heat to medium low, cover and simmer for 35-40 minutes.
Add the sausage and potatoes and return to a boil. Reduce heat to medium low again and cook, uncovered for 30 minutes.
Remove the bay leaves and serve over rice. Make tummies very happy.
Ten points if you got that song reference and thank you Frank, for getting that version of the classic song stuck in my head whenever I make this recipe.
This might be it, folks. This just might be the favorite recipe in our house. Every time I make it, people ask for the recipe. Every time I make it, Jamie says, “You know, I really don’t love Shawarma, but this is amazing!” and he then proceeds to eat fourths or fifths. Every time. When I remind him that this happens every time, he looks at me like I am insane. Every time.
Anyway, I fell in love with Indian and Middle Eastern food in my childhood thanks to my mother’s cooking and my father’s moving us all over the globe. Tragically, as adolescence, and then adulthood moved in, I forgot about Shawarma. It wasn’t until a few years ago that Tony Stark, in the Avengers movie, reminded me of its wonders. My quest for the perfect recipe began almost as soon as we returned from the theater, but my need for that magical, taste bud-caressing curry flavor couldn’t be sated by the recipes I found online. I began to play.
What follows is the latest version of an ever-evolving four year Chicken Shawarma research project that will make even professed curry-haters, like those in my home, beg for more. I always double this recipe with the hopes that I might actually have leftovers enough to make another family meal, but am always denied that pleasure by the hungry masses.
I do this so unconventionally that some might say it’s not even Shawarma, but let them. Instead of grilling an entire chicken breast, I actually cube my chicken and cook it in the marinade. The spices infuse the chicken better and I am unwilling to sacrifice a lick of flavor. I also have switched from a yogurt-based sauce to sour cream, but you can use fat free and it will not change the flavor. Additionally, I use peanut butter in my sauce instead of tahini because it’s easier to find and stores better. Andrew told me last night that the “sauce is boss” and he could drink it from a glass. Daniel actually got busted eating the sauce with a soup spoon.
In the summer I will marinate the chicken for a longer time and grill it in strips on the barbecue because Shawarma is almost a weekly staple here when it’s hot out. That mixture of seasoning and the fresh tomato and lettuce just screams refreshing during the sweltering months (that’s April or so through October or November in Louisiana). When you grill, warm the pitas 1 min per side on the grill before filling.
I used wheat pocket bread this last time because the store was out of true pitas, but dinner was still a hit. So without further ado, I bring you…
Saucy goodness!
I can almost taste it
Chicken Shawarma
Prep Time: About 30 minutes, plus 30 min-24 hr marinating time Serves: My 4 if you double the recipe
Ingredients (Marinade)
2 TBSP lemon juice
2 tsp curry powder
2 tsp olive oil
3/4 tsp salt
1/2 tsp cumin
3 cloves minced garlic, or sub garlic powder
1 pound boneless, skinless chicken breast, cubed
Additional/optional marinade ingredients
1/2 tsp tumeric
1/2 tsp dried mustard
2 tsp vinegar
salt and black pepper to taste
Sauce Ingredients
1/2 cup sour cream
2 TBSP peanut butter
3 & 1/2 tsp lemon juice
1/4 tsp + salt to taste
1-2 tsp garlic powder to taste
1/4 cup fresh parsley
1/2 small, peeled cucumber
To serve
Pita bread
chopped Romaine lettuce
chopped tomatoes
Directions
Combine the marinade ingredients in a bowl and add the cubed chicken. Toss to coat all pieces and marinate for 20 minutes (great) at room temperature or up to 24 hours (greatest) in the refrigerator.
In large skillet on medium high, add the contents of the marinating chicken, cooking and stirring until the chicken juices run clear, about 6 minutes.
Drain the liquid and push the chicken to the sides of the skillet, then add a little olive oil or butter to the center of the skillet. Turn your heat up and cook the chicken for 2-3 minutes, just long enough to crisp the outside of the meat slightly. Remove from heat, but keep warm.
In a food processor or blender, combine all of the sauce ingredients, including cucumber and parsley, and puree.
Cut pitas in half and warm for 10 seconds in the microwave, or in a skillet coated with cooking spray.
Fill pitas with meat, lettuce and tomato, then top with sauce.
Hold onto your hat and enjoy! Your taste buds will thank you.
I played with this title for quite a while, finally settling on Spinach Arrrtichoke Dip, complete with the dip sculpted into a skull and crossbones on the plate as my featured image. Sadly, someone who shall remain nameless stumbled upon the plate and ate said skull and crossbones before I could get the photo. Heartbroken and giving up on my second choice, Asgardian Spinach Artichoke Dip, complete with horrible sculpted Mjölnir, I have opted for plain vanilla. Darnit! That skull was cool.
NAILED IT!!!
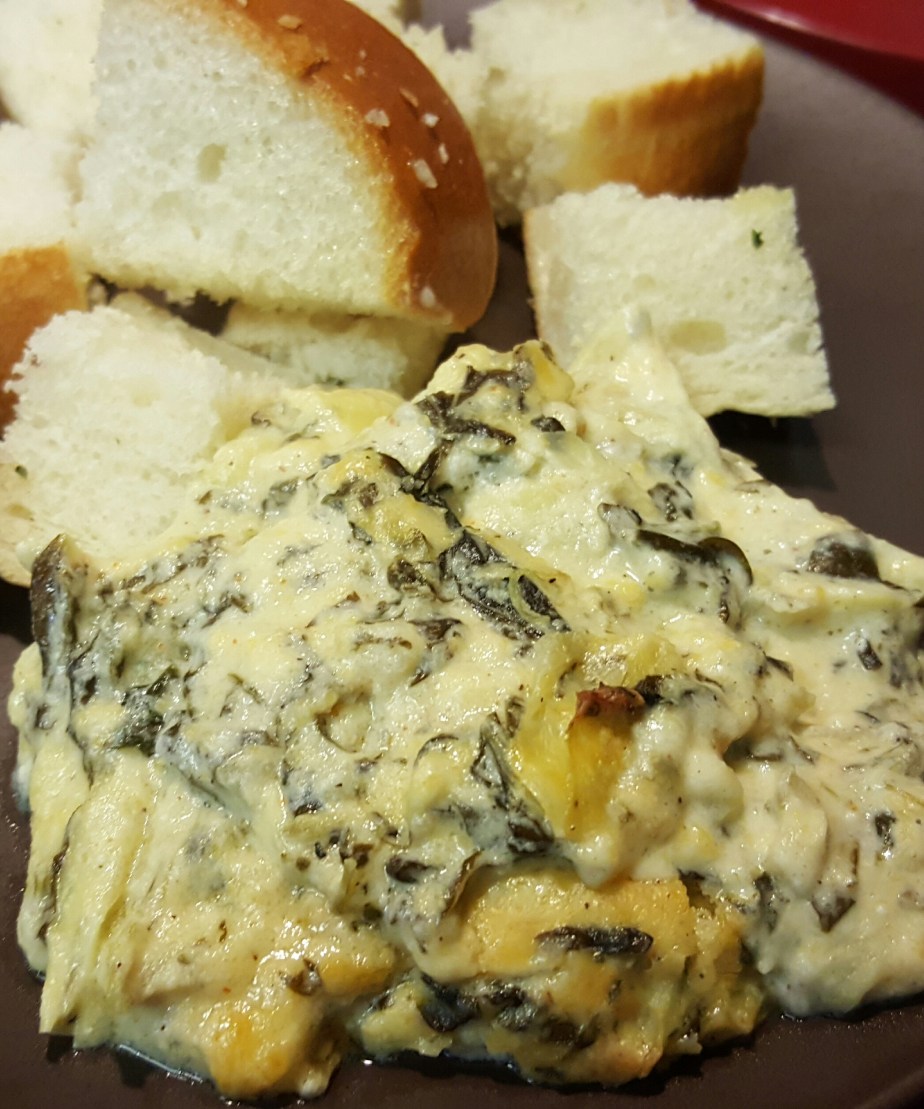
Anyway, few things can be as delicious as a good spinach artichoke dip, but few things can be a nauseating as a poorly made spinach artichoke dip. Luckily, this easy take on a classic is a fairly difficult recipe to mess up. I have played with it for years and, like most of the things I make, it’s rarely the same twice, but it’s always good. We make it our meal because it’s filling and stands alone nicely.
You can play with the cheeses, adding extra and other varieties like cheddar, mozzarella and Parmesan, and you can also go fat free with the mayo, sour cream and cream cheese. We, of course, love a nice helping of Tony’s mixed in with ours and I do the whole shebang in my food processor to keep it simple. I always double the recipe, but try a single and have fun with it.
I’m actually laughing as I read my old recipe card because I certainly add extra seasoning and cheeses, having never, since the first time, actually stuck to the recipe. Still good, I promise.
Spinach Artichoke Dip
Oven 350°
Ingredients
1, 14 oz can artichoke hearts, drained and chopped
1/2 (10 oz) package frozen spinach, drained and chopped
1/2 cup sour cream
1/4 cup mayo or Miracle Whip
1/4 cup cream cheese
1/4 cup grated Romano cheese
1/4 tsp minced garlic
Other
French or other bread, cubed or tortilla chips for dipping
Mix all ingredients well and then place in a baking dish, ensuring your dip is no deeper than 3/4-1 inch thick. Cover loosely with foil and bake for about 25 minutes or until hot and bubbly.
Serve with a good bread or tortilla chips and enjoy.
Good morning from stormy Louisiana! I am feeling pretty good today because I do love myself a good thunderstorm, in spite of a trauma I suffered earlier…I headed out into the downpour, opting not to wear my Gorton’s fish stick guy rain slicker (mistake), to feed the chickens today and all was right with my little world. I love the rain on my face and in my hair, the scent of clean earth and the way the greenery changes color when lightening shoots across the sky during these storms. The raincoat feels like it blocks too many senses with which to enjoy these things sometimes…if that makes sense.
I guess I need to stop here and tell you a secret. Like all nerds before me, I believe I have something of a super power. No, I am not delusional, but I really do have the ability to walk through a spider web where none are expected or have been before. If ever you are blazing a trail and need that person to lead the way solely for the purpose of spider web discovery, I’m your “man.” Indiana Jones would have loved me! I’m not bragging here, just stating fact. The down side is that I loathe spiders and, as tough as I think I am, those little eight-legged monsters can turn me from bad a$$ pioneer woman into a break dancing, freaking little girl in an instant, making the people in this video look like gladiators (sorry for a little language in the video).
Anyway, as I walked out to the coop today, enjoying the weather, my shins suddenly felt resistance and I was sent sprawling into the mud. As I fell forward, time seemed to slow to a crawl and thoughts swirled through my head: I thanked God that my face had not made contact with this web, I was also grateful for soft, muddy ground on which to land and not the concrete I’d just stepped off of, and OMG! What kind of mutant creature makes a web so strong that it can knock me off of my feet!?!
I gave zero thought to who might be watching this spectacle as I sprang to my feet, using my best karate, break dancing and gymnastics moves to beat the crap out of myself, assuring that I had not picked up a hitchhiker. It was exactly like this, but add mud and rain into the mix and subtract flaming shoes. Skip to 54 seconds if you don’t want to hear most of the bad language and hit the restroom first so you don’t wet your pants laughing (Note if you skip ahead; he had spilled gas on his shoes)
This strange dance lasted for what felt like hours, but likely was only seconds, until I felt I was spider free and that I might survive this horror. I was actually out of breath and thought a coronary might be what was for breakfast today when I stumbled back into the house.
My children immediately ran to my side, certain I was in real trouble, but I assured them that I would recover…in time. Yes, I was muddy and out of breath, but no, I had not been wrestling a prowler or bear at the chicken coop. My neighbors likely think that I am plagued by an aggressive ghost, am a martial arts champion, or I’m just plain crazy, but they’ve seen this display many times, so I’m not going to sweat it.
What does this have to do with rosemary potatoes? Not a frickin’ thing, but I had to get that off of my chest. Talking it through promotes healing.
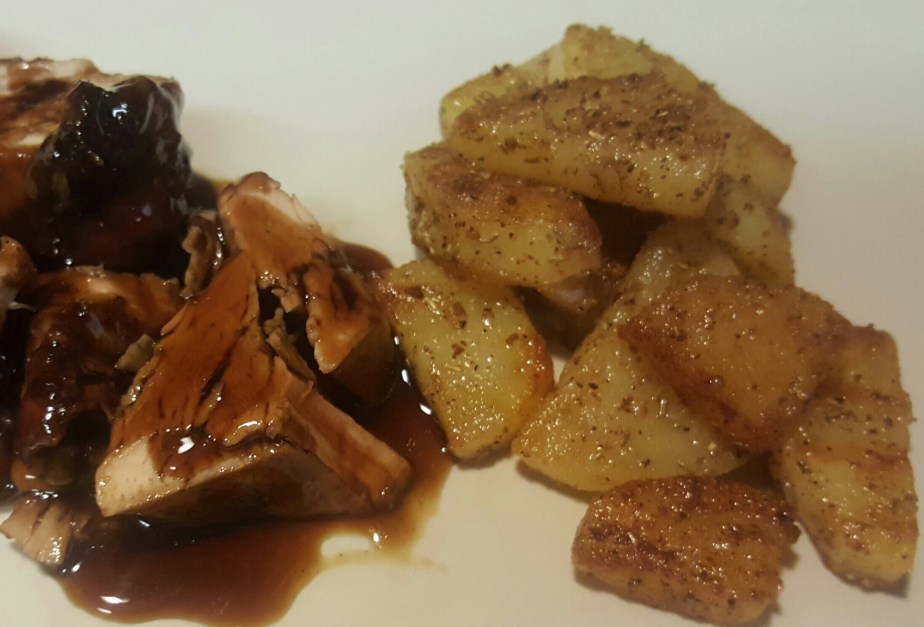
Any-hoo, these are a nice, quick treat and a delicious side when you don’t have an hour to roast them in the oven. Enjoy.
1 & 1/2 pounds red or white potatoes, peeled or unpeeled, cut in lengthwise quarters and then 1/2 inch pieces
1/8 cup olive oil
1/2-3/4 tsp salt, or to taste
1/2 tsp black pepper
1 TBSP minced garlic or garlic powder
2 TBSP dried (or fresh) rosemary (I grind my dried rosemary in the food processor or with a mortal and pestle to avoid eating twigs)
1-2 TBSP butter, if needed
Directions
Heat the olive oil in a large skillet on medium high heat and then add the potatoes, stirring to coat them with the oil. Add all but the butter and stir/toss to coat the potatoes.
Cook, stirring often, for about 15-20 minutes, adding butter, if needed to prevent sticking, evenly coat the potatoes with the seasonings and promote a nice crust on the potatoes. Potatoes are finished when they are crusty on the outside and perfect on the inside.
Serve alone or drizzle with your favorite sauce or condiment. A nice compliment to almost any meat main dish.


 creamy goodness!